

Every WordPress site ships with the exact same login screen — grey background, the WordPress logo, a plain form. It works fine when you’re the only one logging in. But the moment clients, customers, or team members start using it, that default screen creates an obvious disconnect: the rest of your site is carefully branded, and then there’s this generic entry point that looks like every other WordPress installation on the internet.
Customizing that page is faster than most people expect, and the approach you should take depends entirely on what you’re trying to achieve. This guide covers four methods, from a five-minute free plugin to full custom code, and explains exactly which one fits your situation.
wplasma.com — WordPress tutorials and guides
Quick Summary: Which Method Is Right for You?
Here’s the short version before we get into the specifics. There are actually two fundamentally different ways to approach this:
- Path A — Restyle the existing login page: WordPress’s built-in login page (
wp-login.php) stays in place, but you change how it looks using a plugin or custom CSS/PHP code. This is the most common approach. - Path B — Replace it with a custom page: You create a brand-new WordPress page with a login form and redirect users there instead. This gives full layout control but requires a page builder or form builder.
| Method | Best For | Skill Level | Cost | Flexibility |
|---|---|---|---|---|
| Login customization plugin | Quick branding, most users | Beginner | Free / $99+/yr | Medium |
| Custom PHP + CSS code | Developers, no plugin overhead | Intermediate–Advanced | Free | Highest |
| Page builder (SeedProd) | Full page redesign | Beginner–Intermediate | $39.50+/yr | High |
| Form builder (WPForms) | Embedded login form on any page | Beginner | $159+/yr (Pro) | Medium-High |
Quick decision guide:
- “I just want to swap the logo and change the background” → Free login plugin (five minutes)
- “I’m delivering a client site and need no WordPress branding” → LoginPress Pro or custom code
- “I want a login page that looks like the rest of my site, with my header and footer” → SeedProd or Elementor
- “I need a login form embedded inside a page or sidebar” → WPForms with User Registration Addon
- “I’d rather write code than install another plugin” → Custom PHP + CSS in your child theme
What the WordPress Login Page Actually Is
The default WordPress login page is a core file called wp-login.php. You reach it by typing yourdomain.com/wp-login.php or yourdomain.com/wp-admin in your browser (the second URL redirects to the first if you’re not logged in).
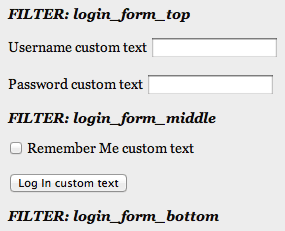
By default it contains: the WordPress logo with a link to WordPress.org, a form with username/email and password fields, a “Remember Me” checkbox, a “Lost your password?” link, and a link back to your site’s homepage. That’s it — no branding, no customization, just a functional but visually plain entry point.
Because it’s a WordPress core file, every installation looks the same out of the box. That’s partly by design — it keeps the core consistent and secure. But it also means the file is publicly accessible at a predictable URL, which is exactly why attackers target it with automated brute-force attempts. (More on that in the security section.)

Understanding this matters when choosing your approach. Methods 1 and 2 (plugin + code) restyle this existing wp-login.php page — same URL, same form mechanics, different visual presentation. Methods 3 and 4 (page builder + form builder) effectively bypass it entirely by creating a new page with a login form and redirecting users there. Both paths lead to a branded login experience, but they work very differently under the hood.
Why Customize the WordPress Login Page
There are four practical reasons this matters, especially for small business sites:
Branding consistency. If someone logs into your membership site, WooCommerce account, or online course portal, they’re already familiar with your brand’s colors, fonts, and feel. Then they hit a screen that looks like a generic WordPress installation. That disconnect is subtle but real — it can make users question whether they’re actually on your site.
User trust. A branded login screen signals that someone put care into the experience. For sites that handle payments or personal data, this matters more than it seems. A polished login screen is part of the overall signal that this is a legitimate, professional operation.
Client deliverables. If you build sites for clients, handing over a site that shows the WordPress logo on the login screen is a detail clients notice. A branded login page — even a simple one with their logo and colors — rounds out the work and demonstrates thoroughness.
Security opportunity. Customizing the login page naturally opens the door to adding protections you should probably have anyway: changing the login URL, adding CAPTCHA, customizing error messages. These are easier to implement while you’re already in the login settings.
More WordPress tutorials and how-tos on wplasma.com
Path A: Restyling wp-login.php
Method 1 — Using a Login Customization Plugin (Recommended for Most Users)
Login customization plugins work by injecting styles into wp-login.php using WordPress’s built-in hooks. No code editing required — you get a visual interface where you tweak settings and see results in real time.
LoginPress is the most-downloaded tool for this purpose. It’s been downloaded over 7 million times and holds a 4.8/5 rating from more than 1,000 reviews on WordPress.org (as of March 2026). The free version covers everything most users need: logo swap, background image or color, full form styling, button design, and error message control. The Pro version ($99/year for 2 sites, $199/year for unlimited) adds social login, CAPTCHA, role-based redirects, and the ability to change the login URL.
How to set it up (LoginPress free):
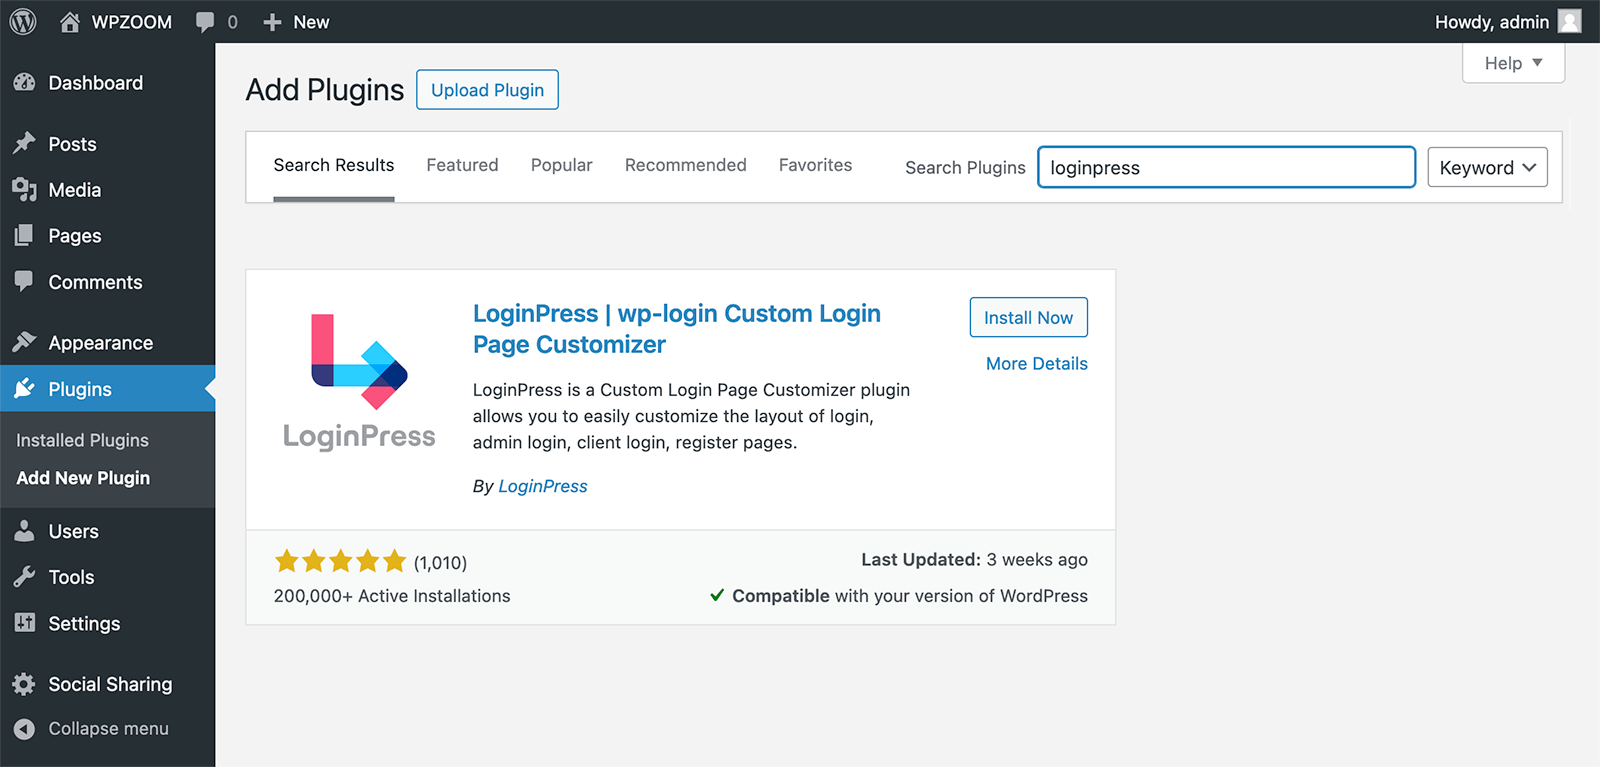
- Go to Plugins > Add New, search for “LoginPress”, click Install Now, then Activate.
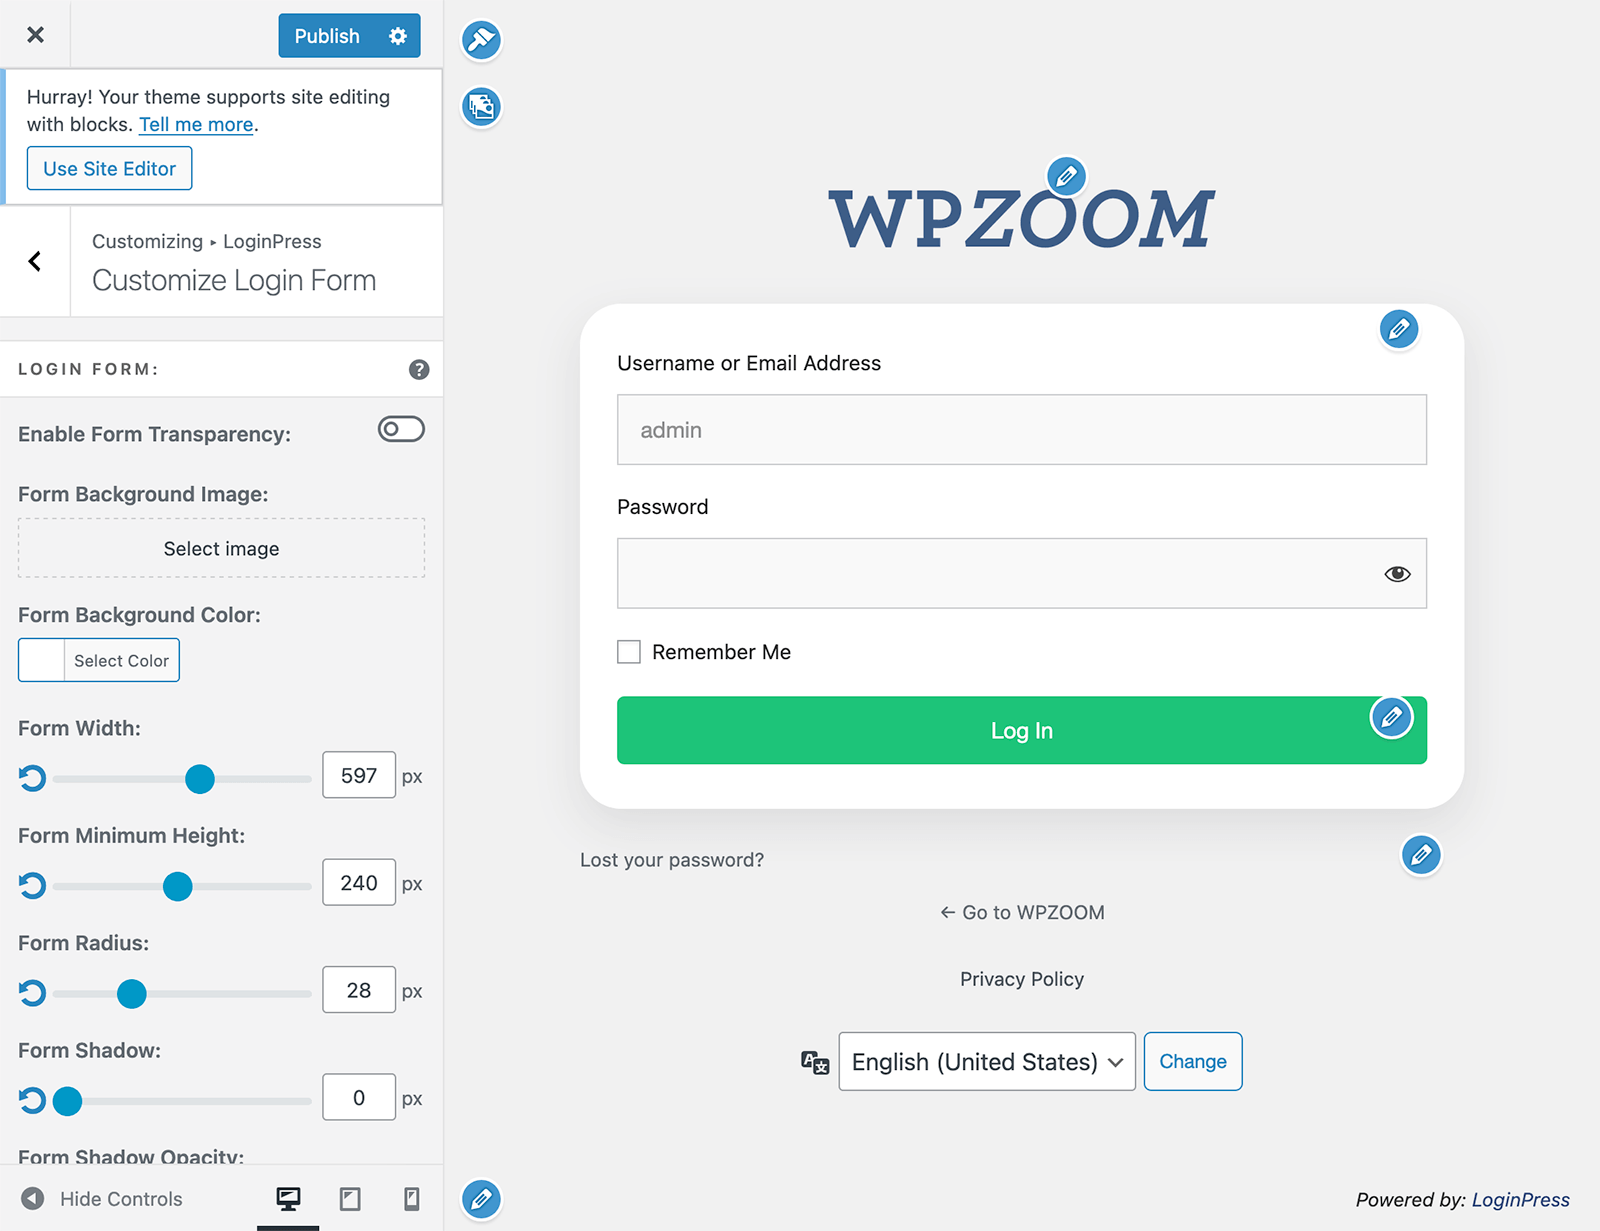
- Navigate to LoginPress > Customizer. This opens the WordPress Customizer with your login page loaded in the preview panel.
- Logo: Upload your brand logo, set width and height, change the URL so it points to your homepage instead of WordPress.org.
- Background: Upload a full-screen background image (aim for at least 1920×1080px, under 500KB) or choose a solid color.
- Login Form: Adjust the form width, background color, border radius (for rounded corners), shadows, and input field colors to match your brand.
- Button: Set the submit button’s background color, hover state, and font size so it stands out clearly from the form fields.
- Error Messages: This is often skipped but matters for security — see the callout below.
- Click Publish when you’re satisfied. Clear your site cache if changes don’t appear immediately.
Security win inside Method 1 — Customize error messages:
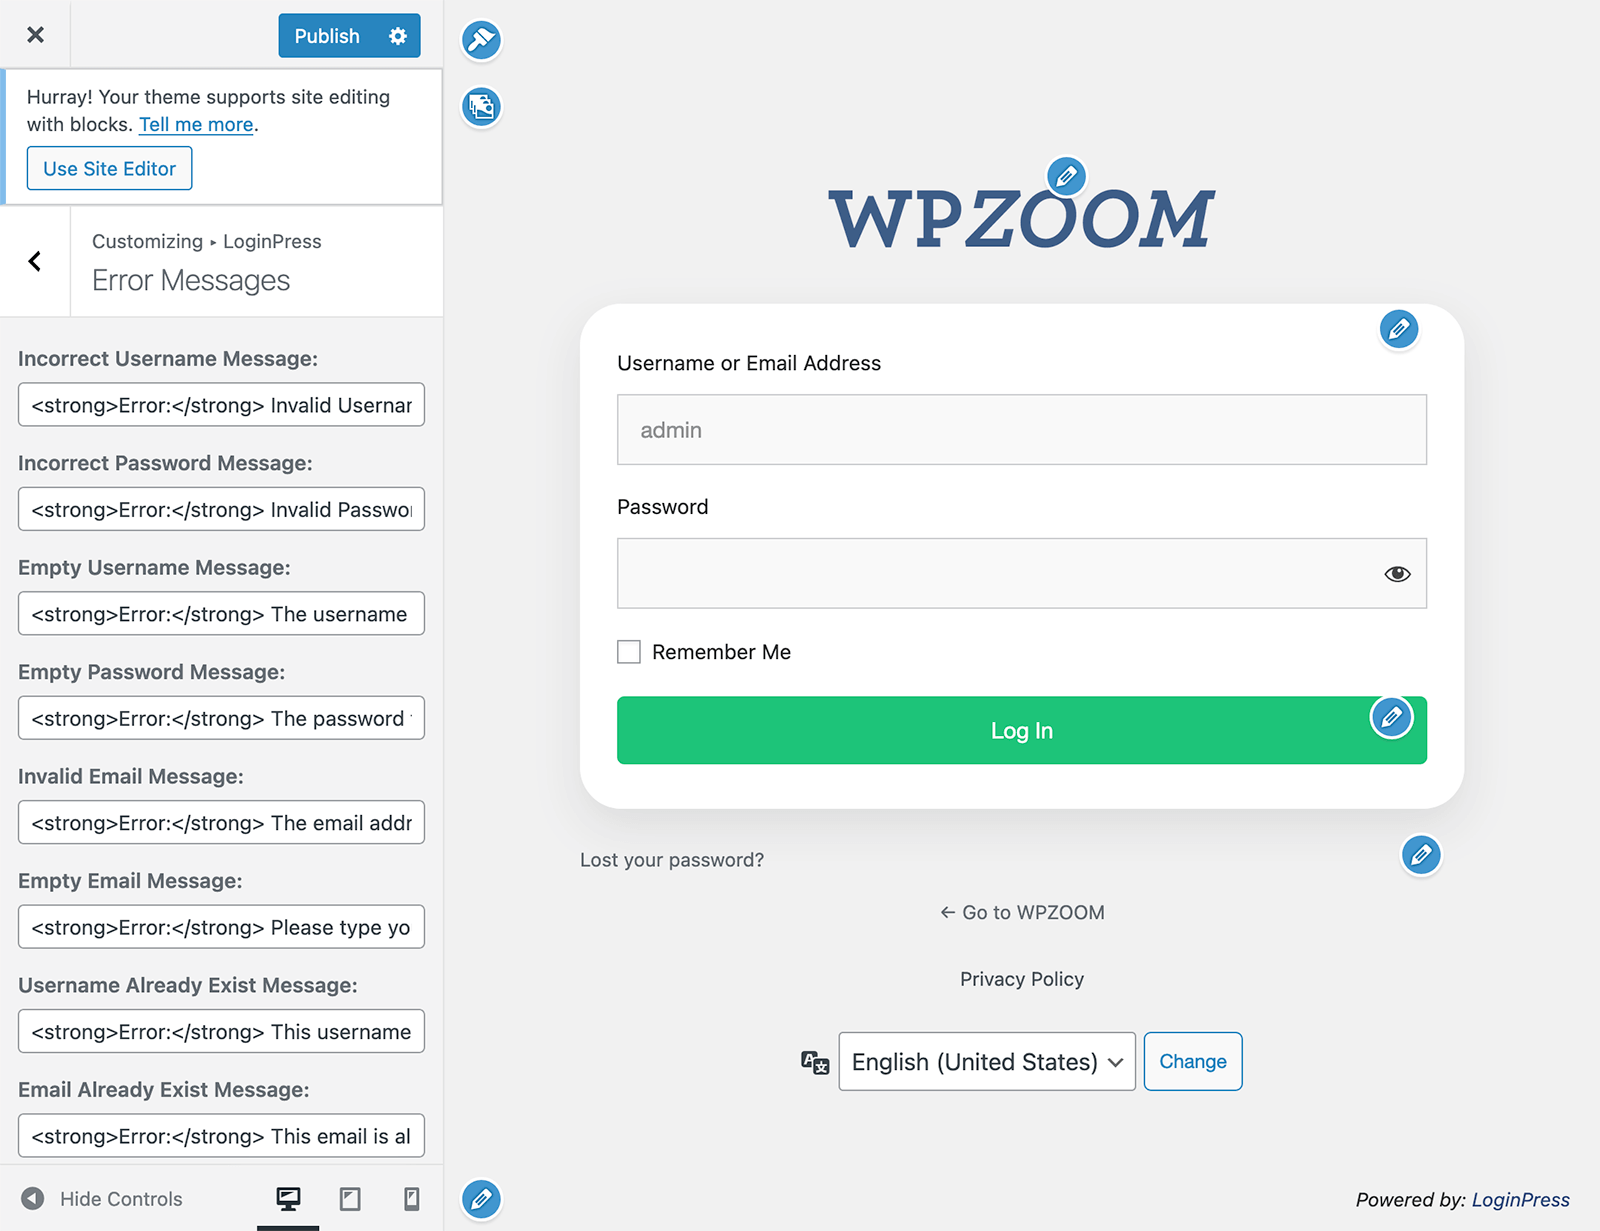
WordPress’s default error messages can confirm whether a specific username exists on your site. If someone types “admin” as the username and gets the message “The password you entered for the username admin is incorrect,” they now know “admin” is a valid user. In LoginPress, go to LoginPress > Customizer > Error Messages and replace all messages with something generic — “Your login credentials are incorrect. Please try again.” This removes the information leak entirely.
One important note: If you deactivate LoginPress, your login page reverts to the WordPress default immediately. Your settings are stored in the database, so they’ll reappear if you reactivate the plugin — but there’s no fallback while it’s inactive.
Two solid free alternatives worth knowing:
- Custom Login Page Customizer (login-customizer): 90,000+ active installs, 4.8/5 rating, updated January 2026 with a security fix. Works from the Appearance menu instead of a separate LoginPress panel. Includes custom CSS/JavaScript fields and multisite support.
- Colorlib Login Customizer: 50,000+ active installs, 4.9/5 rating from 469 reviews. Offers 9 professionally designed templates including glassmorphism, dark themes, and split-screen layouts. Requires PHP 8.0 or higher (check your hosting environment before installing).

Method 2 — Custom CSS and PHP Code (No Plugin Required)
If you’d rather not add a plugin dependency, or if you want precise control over every element, you can customize wp-login.php entirely through code. Everything goes into your child theme’s functions.php file — never the parent theme, because parent theme files get overwritten during updates.
Before you start: Create a child theme if you haven’t already, and make a backup of your site. Test on a staging environment if possible — a typo in functions.php can break your login page.
Replace the WordPress logo with your own:
function my_custom_login_logo() { ?>
  <style type="text/css">
    #login h1 a {
      background-image: url('<?php echo get_stylesheet_directory_uri(); ?>/images/custom-logo.png');
      width: 300px;
      height: 80px;
      background-size: contain;
      background-repeat: no-repeat;
      padding-bottom: 20px;
    }
  </style>
<?php }
add_action('login_enqueue_scripts', 'my_custom_login_logo');
What this does: Uses WordPress’s login_enqueue_scripts action hook — which runs specifically on the login page — to inject CSS that replaces the default WordPress logo image with yours. The image file goes in an /images/ folder inside your child theme directory.
Make the logo link to your homepage (instead of WordPress.org):
function my_login_logo_url() {
  return home_url();
}
add_filter('login_headerurl', 'my_login_logo_url');

function my_login_logo_title() {
  return get_bloginfo('name');
}
add_filter('login_headertext', 'my_login_logo_title');
What this does: Two WordPress filters — login_headerurl changes where the logo links, and login_headertext updates the hover title text. Both are commonly used together after the logo replacement above.
Add a custom background image:
function my_login_background() { ?>
  <style type="text/css">
    body.login {
      background-image: url('<?php echo get_stylesheet_directory_uri(); ?>/images/login-bg.jpg');
      background-size: cover;
      background-position: center center;
      background-repeat: no-repeat;
    }
  </style>
<?php }
add_action('login_enqueue_scripts', 'my_login_background');
What this does: Injects a background-image CSS rule on body.login — the specific selector for the login page body. background-size: cover ensures the image scales to fill the screen on all devices.
Replace default error messages (security):
function my_custom_login_error() {
  return 'Your login credentials are incorrect. Please try again.';
}
add_filter('login_errors', 'my_custom_login_error');
What this does: Intercepts WordPress’s default verbose error messages with a generic one. This prevents the login page from confirming which part of a login attempt was wrong — a standard security hardening step.
CSS selectors for fine-grained control: Once you have a login-specific stylesheet (enqueued via wp_enqueue_style through login_enqueue_scripts), you can target every element precisely:
body.login— page background.login form— the form container.login form input— all input fields.login .button-primary— the submit button.login #nav a— “Lost your password?” and navigation links.login #backtoblog a— “Back to [site]” link
More WordPress development tips on wplasma.com
Path B: Replacing wp-login.php with a Custom Page
Sometimes restyling wp-login.php isn’t enough. If you want a login page with your site’s full header and footer, custom sections alongside the form, or a completely different layout than the centered form box, you need to create an entirely new page and redirect login traffic to it.
Method 3 — Page Builders: SeedProd or Elementor
Page builders create a regular WordPress page that contains a login form widget or block, then handle the redirect from /wp-login.php and /wp-admin to your new page. The result is a login experience that can include any page element — images, video, testimonials, custom layout — alongside the actual login form.
SeedProd is a dedicated landing page and theme builder with a specific login page module. Its Basic plan starts at $39.50/year for one site (March 2026 pricing). Quick setup:
- Install and activate SeedProd, enter your license key.
- Go to SeedProd > Landing Pages and click Set up a Login Page.
- Choose a template, then use the drag-and-drop editor to add your logo, adjust colors, and position the login form widget.
- In Page Settings, enable the option to redirect the default login page — this routes
wp-login.phptraffic to your new page automatically. - Save and publish.
Elementor Pro takes a similar approach using its Login widget. You build a custom page, add the Login widget, style it with Elementor’s controls, and then use a redirect plugin (such as WPS Hide Login) to route login traffic to your custom page. Elementor Pro pricing varies — check elementor.com for current plans.
When to use this approach: Membership sites with high daily login volume, online course platforms (LearnDash, LifterLMS), WooCommerce stores with account portals, or any situation where you want the login page to feel like an integral part of your site’s design system.
Method 4 — Form Builders: WPForms with User Registration Addon
Form builders take yet another angle. Instead of redesigning the login URL, they let you embed a working login form anywhere using a shortcode or block. The form itself handles the WordPress authentication — it just lives inside a regular page, post, or sidebar rather than on the default login screen.
WPForms supports this through its User Registration Addon, which is available on the Pro plan or higher. Current pricing is approximately $159+/year — check wpforms.com for the most recent rates.
Setup:
- Go to WPForms > Addons and activate the User Registration Addon.
- Create a new form using the User Login Form template.
- Customize field labels, add a “Forgot Password?” link, and configure the form’s settings.
- Embed on any page using the WPForms block or the
[wpforms id="YOUR_ID"]shortcode. - To redirect users away from the default login URL, pair this with a free redirect plugin.
When to use this approach: You already have a WPForms Pro license and want a login form in a specific page section, sidebar widget, or popup — rather than a standalone login page.
Plugin Comparison: Best WordPress Login Page Plugins (March 2026)
Five plugins handle the majority of WordPress login customization cases. Here’s how they compare based on verified data:
| Plugin | Price | Active Installs | Rating | Key Strength | Limitation |
|---|---|---|---|---|---|
| LoginPress | Free / $99+/yr Pro | 7M+ downloads | 4.8/5 | Video background, social login, most features in free | CAPTCHA and login URL change require Pro |
| Custom Login Page Customizer (login-customizer) | Free | 90,000+ | 4.8/5 | WYSIWYG preview, custom CSS/JS, multisite, PHP 5.6+ | Fewer templates than competitors |
| Colorlib Login Customizer | Free | 50,000+ | 4.9/5 | 9 modern templates, multi-column layouts | Requires PHP 8.0+ (may need hosting upgrade) |
| Theme My Login | Free | 100,000+ | 3.5/5 | Automatically matches active theme — zero setup | Almost no visual customization options |
| SeedProd | $39.50+/yr | 1M+ | 4.8/5 | Full page redesign, drag-and-drop, templates | Paid only for login page feature |
Bottom line: LoginPress free is the strongest starting point for logo, background, and form styling. Custom Login Page Customizer (login-customizer) is a solid free alternative with a slightly simpler interface. Colorlib Login Customizer stands out for template variety but requires a modern PHP version. If you need zero customization and just want the login page to match your theme automatically, Theme My Login is the quickest option — though it provides almost no control over the visual result.
WordPress plugin guides and comparisons — wplasma.com
How to Secure Your WordPress Login Page
WordPress sites face approximately 40 million brute force login attempts per day globally, according to security research data. The login page is the single most targeted entry point. When you’re already customizing it, adding these protections takes very little extra time.
1. Change your login URL. The default /wp-login.php and /wp-admin paths are known to every bot targeting WordPress sites. The free plugin WPS Hide Login lets you set a custom URL (like yourdomain.com/my-access-point) in a few clicks.
⚠️ Important: Bookmark the new login URL immediately and inform all site administrators before making the switch. If you forget the custom URL, you can deactivate the plugin via FTP by renaming its folder in /wp-content/plugins/ to restore the defaults.
2. Customize error messages. As covered in Method 1 and Method 2 above, replacing default error messages with a generic version prevents attackers from confirming valid usernames. This is one of the easiest security improvements you can make.
3. Add CAPTCHA. Automated bots can attempt thousands of login combinations per minute. A CAPTCHA challenge stops them. LoginPress Pro includes Google reCAPTCHA, hCAPTCHA, and Cloudflare Turnstile. For the free route, Advanced Google reCAPTCHA or Cloudflare’s Turnstile (free at the platform level) work alongside any login customization approach.
4. Enable two-factor authentication (2FA). Two-factor authentication adds a second verification step — typically a time-based code from an authenticator app — after the password. Research indicates 2FA reduces unauthorized login attempts by approximately 73%. The free plugin WP 2FA handles this well and integrates with most authenticator apps.
5. Limit login attempts. WordPress allows unlimited login attempts by default, which is what makes brute force attacks possible. Limit Login Attempts Reloaded (free, 2M+ installs) sets a cap on failed attempts before temporarily locking out the IP address. LoginPress Pro includes its own limit login attempts feature if you prefer a single-plugin solution.
Troubleshooting Common Login Page Issues
Most login customization problems fall into a handful of patterns, each with a straightforward fix.
Changes not showing after customization. The most common cause is caching. Clear your caching plugin’s cache first (W3 Total Cache, WP Super Cache, LiteSpeed Cache), then clear your browser cache. If you’re using a CDN like Cloudflare, purge the CDN cache as well. Also confirm the plugin is active or that your code is saved in the correct file.
Login redirect loop. If WordPress keeps sending you back to the login screen after entering correct credentials, the usual culprits are browser cookie issues or a mismatched site URL in the database. Clear your browser cookies and cache. If the problem persists, check whether the siteurl and home values match in your database’s wp_options table via phpMyAdmin. A recently installed plugin can also cause this — rename its folder via FTP in /wp-content/plugins/ to deactivate it without dashboard access.
Login page looks broken on mobile. If you used custom CSS, make sure your background images use background-size: cover. Set the login form’s width to a percentage or use a max-width value. For custom stylesheets, add a media query for smaller screens:
@media (max-width: 480px) {
  .login #login {
    width: 90%;
    margin: 0 auto;
  }
}
Plugin conflict. If your login page looks wrong after installing a customization plugin, deactivate other plugins that might also modify the login page or the WordPress Customizer. Switch to a default theme (Twenty Twenty-Five) temporarily to rule out theme conflicts. Check your browser’s developer console (F12) for JavaScript errors that might indicate which plugin is causing the problem.
Customizations disappeared after a theme switch. If you used a login customization plugin, your settings are stored in the database and will persist regardless of theme changes. If you used code in functions.php, you’ll need to copy those functions to your new child theme’s functions.php — they’re tied to the theme files, not the database.
Frequently Asked Questions
What is the WordPress login page URL?
The default WordPress login page is accessible at yourdomain.com/wp-login.php or yourdomain.com/wp-admin (which redirects to wp-login.php if you’re not already logged in). If you’ve used a plugin like WPS Hide Login to change the URL, you’ll need to use your custom login path instead.
Will customizing the login page slow down my WordPress site?
No. Login page customizations only apply to wp-login.php, which is completely separate from your site’s frontend. Visitors browsing your site won’t load any of these styles or scripts. Lightweight plugins like LoginPress load their assets only on the login page. Custom CSS has essentially zero performance impact on public pages.
Can I use a custom login page on a WordPress multisite?
Yes. LoginPress, Custom Login Page Customizer (login-customizer), and Colorlib Login Customizer all support WordPress multisite installations. With code, you can apply network-wide customizations through the network’s functions.php or the mu-plugins directory.
What happens if I deactivate my login customization plugin?
Your login page reverts to the WordPress default immediately. However, your customization settings are stored in the WordPress database, not in the plugin files themselves. If you reactivate the plugin later, your settings will reappear. Nothing is permanently lost when you deactivate.
How do I add my company logo to the WordPress login page?
With a plugin (LoginPress or similar): go to the plugin’s customizer, find the Logo section, upload your image, set width/height, and update the logo URL to point to your homepage. With code: use the login_enqueue_scripts hook to inject CSS that sets your logo as a background image on #login h1 a. Both approaches take under five minutes.
Can I customize the “forgot password” and registration pages too?
Yes. The forgot password and registration pages are part of the same wp-login.php flow. Login customization plugins like LoginPress, Custom Login Page Customizer, and Colorlib Login Customizer apply your styling to all of these screens automatically. If you’re using custom code, the same CSS selectors and hooks apply across all login-related screens.
Do login page customizations survive WordPress core updates?
If you used a plugin: yes, completely unaffected by core updates. The plugin handles any compatibility updates it needs. If you used code in a child theme: also yes — child theme files are never touched by WordPress or parent theme updates. If you accidentally put code in the parent theme’s functions.php instead of the child theme, a theme update would overwrite it.
How do I reset the login page back to the WordPress default?
Deactivate your login customization plugin — the page reverts immediately. For code customizations, remove the relevant functions from your child theme. If you’re locked out and can’t reach the dashboard, use FTP to rename the plugin’s folder in /wp-content/plugins/ to deactivate it.
Is it safe to change the /wp-login.php URL?
Yes, and it’s generally recommended as a basic security measure. Moving the login URL doesn’t prevent a determined attacker, but it does stop the vast majority of automated bots that target the default path. Use a reliable plugin like WPS Hide Login, keep a record of the new URL, and ensure all administrators know the new address before switching.
Can I have different login pages for different user roles?
Not natively with most free login customization plugins. LoginPress Pro and some advanced membership plugins support role-based login redirects — meaning different user types land on different pages after logging in — but the login page itself typically looks the same for everyone. For truly differentiated login experiences by role, you’d need a custom solution or a membership plugin that handles this at the form level.
Conclusion
The WordPress login page is easier to customize than most people realize, and the method you choose should match your actual goals. A simple logo and background swap takes five minutes with a free plugin. Full layout control over a custom-designed login page requires a page builder. And for developers who prefer clean code without plugin overhead, the PHP hook and CSS approach gives complete control.
Whichever path you take, building security measures in at the same time — changing the login URL, customizing error messages, enabling 2FA — costs very little extra effort and meaningfully reduces the attack surface on the most targeted part of any WordPress installation.
Start with the simplest option that covers your needs, test it thoroughly (including on mobile), and add complexity only when a specific requirement calls for it.