

Your WordPress site is running a cache plugin, you published an updated page — and the old version is still showing up for visitors. Or worse, you just patched a critical bug but half your users are still seeing the broken version. This is a caching problem, and it’s fixable in under 60 seconds once you know where to look.
This guide covers every practical method for clearing WordPress cache in 2026: one-click shortcuts, step-by-step instructions for the five most popular cache plugins, managed hosting dashboards (SiteGround, WP Engine, Kinsta, Bluehost), FTP access, and WP-CLI commands for developers. Whether you’re a blogger managing your first site or a developer deploying to production, you’ll find the exact method you need.
The Quick Answer (Before We Go Deeper)
If you just need to clear your cache right now, here’s the shortest path by situation:
| Your Situation | Fastest Method |
|---|---|
| You have a cache plugin installed | Look for the cache plugin’s button in your WordPress admin bar at the top of the screen → click “Purge All” or “Clear Cache” |
| You’re on SiteGround | WordPress Dashboard → SG Optimizer → Caching → Purge Dynamic Cache |
| You’re on WP Engine | WP Engine User Portal → Installs → [your site] → Caching → Clear All Caches |
| You’re on Kinsta | MyKinsta → Sites → [your site] → Tools → Clear Cache |
| No plugin, FTP access only | Connect via FTP → navigate to wp-content/cache/ → delete all files inside |
| Developer with SSH access | Run wp cache flush via WP-CLI |
Keep reading for detailed, step-by-step instructions for each scenario — including how to handle the specific cache plugin you’re using and what to do when clearing cache doesn’t immediately fix the problem.
What WordPress Cache Is (And Why There Are Multiple Types)
Cache is a stored copy of your site’s content that WordPress serves to visitors instead of rebuilding the page from scratch on every request. Without caching, every single visit to your site triggers PHP execution, database queries, and file loading — all of which take time. A cache plugin saves a static snapshot and delivers it instantly.
The reason clearing cache sometimes feels confusing is that there isn’t just one type of cache. There are five distinct layers, each stored in a different place and cleared in a different way:
| Cache Type | Where It’s Stored | What It Affects | How to Clear It |
|---|---|---|---|
| Browser cache | Visitor’s device (Chrome, Firefox, Safari) | CSS, JS, images stored locally | Browser settings → Clear browsing data |
| Page/HTTP cache | Your web server | Static HTML output of pages/posts | Cache plugin dashboard or admin bar |
| Object cache | Server RAM (Redis/Memcached) | Database query results, transients | WP-CLI wp cache flush or plugin option |
| Server/hosting cache | Managed host infrastructure | All server-level responses | Host dashboard (SG Optimizer, WP Engine panel, MyKinsta) |
| CDN cache | Edge servers worldwide (Cloudflare, BunnyCDN) | Static assets delivered globally | CDN dashboard → Purge/Flush cache |
Most day-to-day caching issues involve the page/HTTP cache layer — the one your cache plugin controls. But if clearing your plugin’s cache doesn’t fix the problem, one of the other layers is likely the culprit.
When Should You Clear the WordPress Cache?
Clear your cache after any change that affects what visitors see on the frontend of your site. Specifically:
- After a WordPress core update
- After activating, updating, or deactivating a plugin or theme
- After editing or publishing a post or page with visible changes
- After modifying custom CSS, theme settings, or the Customizer
- When debugging a layout or display issue (“I see it, but visitors don’t”)
- After switching between staging and production environments
- After making changes to your .htaccess or server configuration
You don’t need to clear cache after saving a draft (it’s not public), updating user profile settings, or installing a backend-only plugin that has no frontend output.
WordPress performance optimization guide
The Fastest Way: Your Admin Bar Cache Button
Before digging into plugin-specific dashboards, check your WordPress admin bar — the black bar across the top of your screen when you’re logged in. Every major cache plugin adds a quick-access button there, and it’s by far the fastest way to purge your cache without navigating into plugin settings.
Here’s what the admin bar button looks like for each major plugin:
- LiteSpeed Cache: Look for “LSCache” → click “Purge All”
- WP Rocket: Look for the WP Rocket icon → click “Clear and Preload Cache”
- WP Super Cache: Look for “Delete Cache” → click to purge
- W3 Total Cache: Look for “Performance” → “Empty All Caches”
- WP Fastest Cache: Look for “Delete Cache” → “Clear All Cache”
If you don’t see a cache button in your admin bar, check that your cache plugin is activated and that “Show in Admin Bar” is enabled in its settings.
How to Clear Cache in Each Major WordPress Cache Plugin
Each plugin has its own dashboard layout. Below is a step-by-step guide for the five most widely used cache plugins in 2026.
LiteSpeed Cache (5+ Million Active Installs — Free)
LiteSpeed Cache is the most actively installed free cache plugin available, with over five million active installations as of 2026 and a 4.8/5 rating on WordPress.org. It runs on any web server (not just LiteSpeed servers) for general features, with advanced server-level caching available on LiteSpeed-powered hosting.
To clear cache from the plugin dashboard:
- In the WordPress left sidebar, click LiteSpeed Cache
- Click Manage
- Under the “Purge” tab, click Purge All
Via the admin bar: Click LSCache in the admin bar → Purge All
Auto-clear setting: Go to LiteSpeed Cache → Cache → Enable “Automatically Purge on Post Publish” to clear the relevant cache automatically every time you publish or update a post.
Tip: LiteSpeed Cache automatically purges the cache after any WordPress core update, plugin update, or theme update — so in most cases, manual clearing is only needed when you’re troubleshooting a specific display issue.
LiteSpeed Cache configuration guide
WP Rocket (Premium — $59/Year for One Site)
WP Rocket is the most popular premium cache plugin for WordPress, priced at $59/year for one site (no free version available). It handles more than 80% of web performance best practices out of the box, including Remove Unused CSS and Delay JavaScript — features not available in most free plugins.
To clear cache from the plugin dashboard:
- Go to Settings → WP Rocket
- On the WP Rocket dashboard, click Clear Cache
Via the admin bar: Click the WP Rocket icon → Clear and Preload Cache
To clear cache for a specific page: Visit the page on your site while logged in → look for the WP Rocket admin bar button → select “Clear this URL’s cache”
Auto-clear setting: Enabled by default — WP Rocket automatically clears the relevant cache whenever you publish or update a post.
Tip: WP Rocket’s “Clear and Preload” option clears the cache and immediately starts rebuilding it in the background, so visitors don’t hit an empty cache and experience a slow page load right after you purge.
WP Super Cache (2+ Million Active Installs — Free)
WP Super Cache is developed and maintained by Automattic (the company behind WordPress.com), which makes it one of the most reliably maintained free cache plugins available. It works by generating static HTML files from your dynamic WordPress pages, then serving those static files to 99% of your visitors.
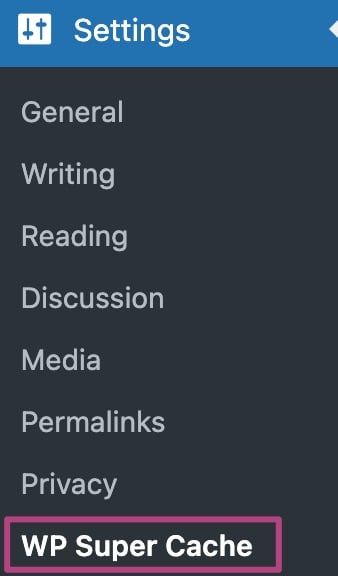
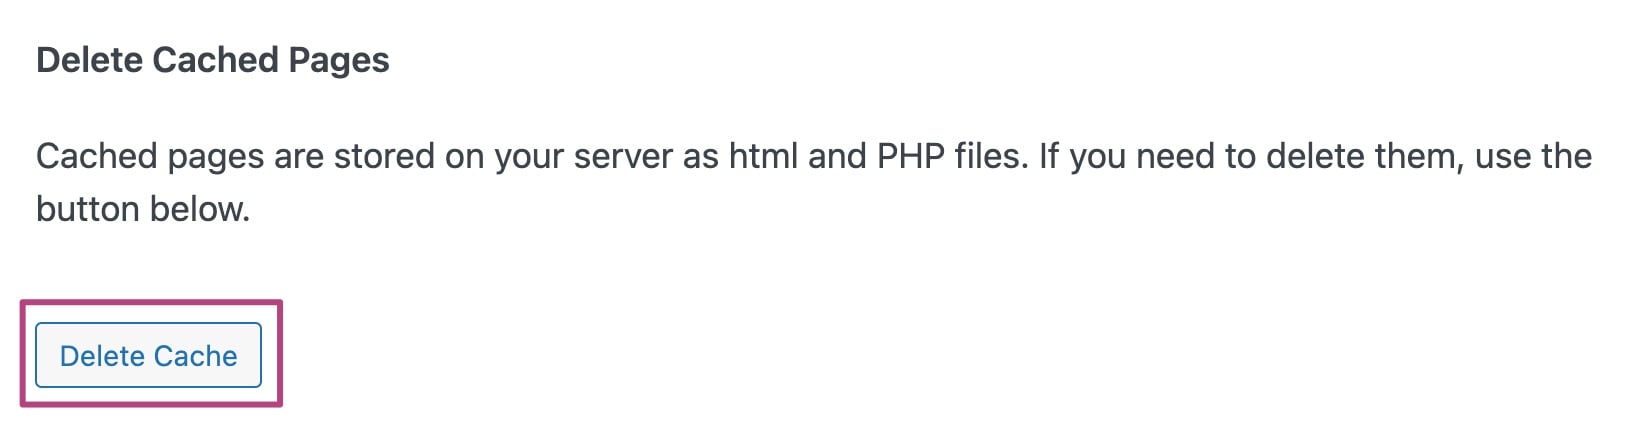
To clear cache from the plugin settings:
- Go to Settings → WP Super Cache
- Click the Easy tab
- Scroll to Delete Cached Pages
- Click Delete Cache
Via the admin bar: Click Delete Cache in the admin bar
To temporarily disable caching (useful during development): Go to Settings → WP Super Cache → Easy tab → uncheck Caching On (Recommended)
Tip: If visitors are still seeing old content after clearing the WordPress page cache, check that they’ve cleared their own browser cache too — browser-stored copies are separate from your server-side cache.
W3 Total Cache (1+ Million Active Installs — Free)
W3 Total Cache is a comprehensive caching framework maintained by BoldGrid, last updated March 5, 2026. It offers granular control over every caching layer — page cache, object cache, database cache, browser cache, minification, and CDN integration. Its depth makes it popular with developers, though it has more settings than most beginners need.
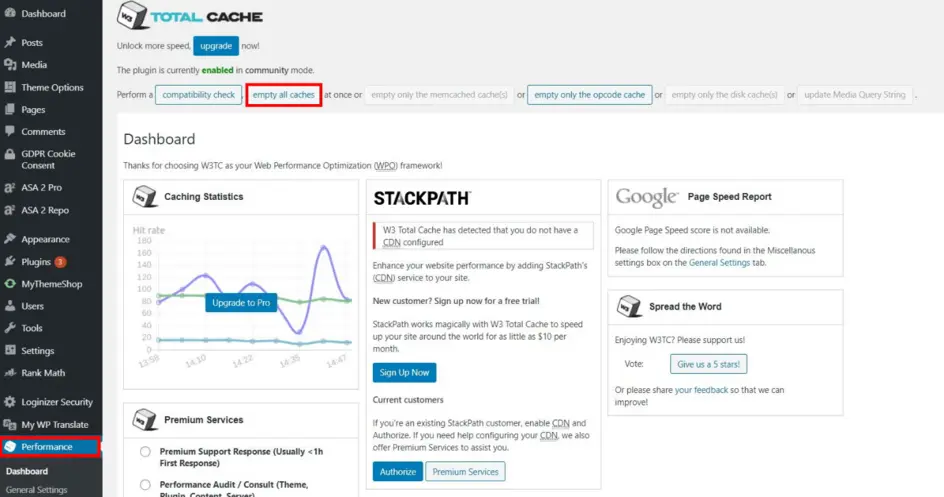
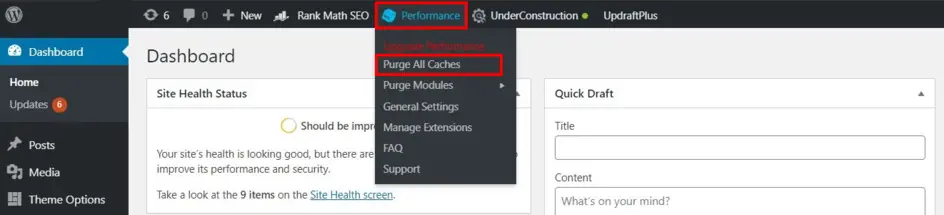
To clear all caches:
- In the WordPress left sidebar, click Performance
- Click Dashboard
- Click the Empty All Caches button
Via the admin bar: Click Performance → Empty All Caches
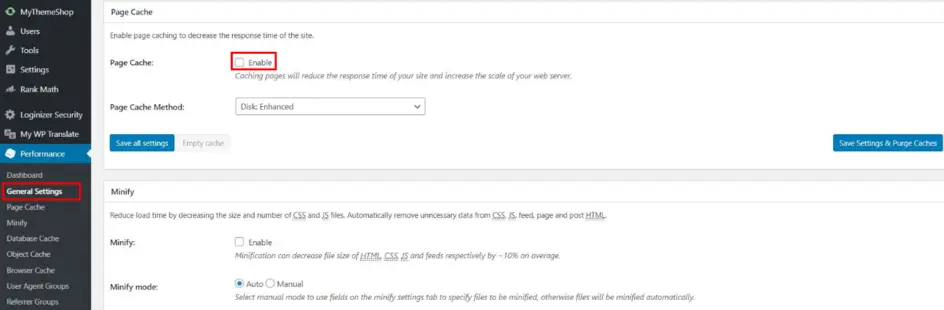
To disable caching temporarily:
- Go to Performance → General Settings
- Uncheck the Enable checkbox next to the cache type you want to disable
- Click Save Settings
Tip: If you’re actively developing or troubleshooting, disable the entire page cache temporarily rather than clearing it repeatedly — this prevents stale cache from being served while you’re making changes.
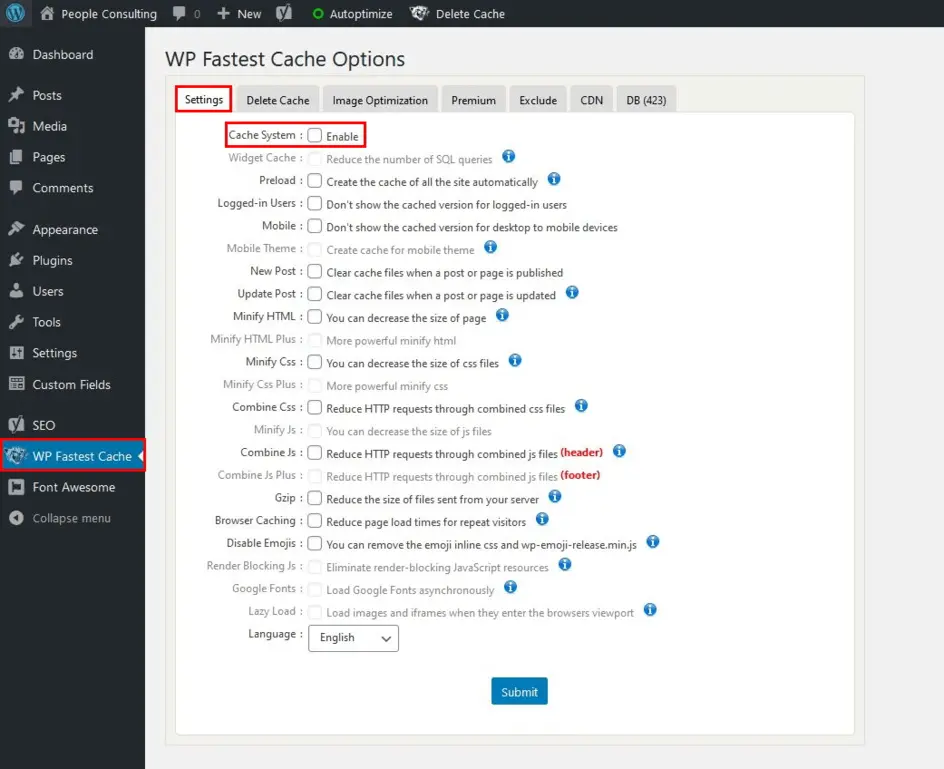
WP Fastest Cache (1+ Million Active Installs — Free/Premium)
WP Fastest Cache is a lightweight cache plugin that handles the essentials without overwhelming users with configuration options. It automatically clears the relevant cache whenever a new post or page is published, which makes it practical for busy blogs and small business sites.
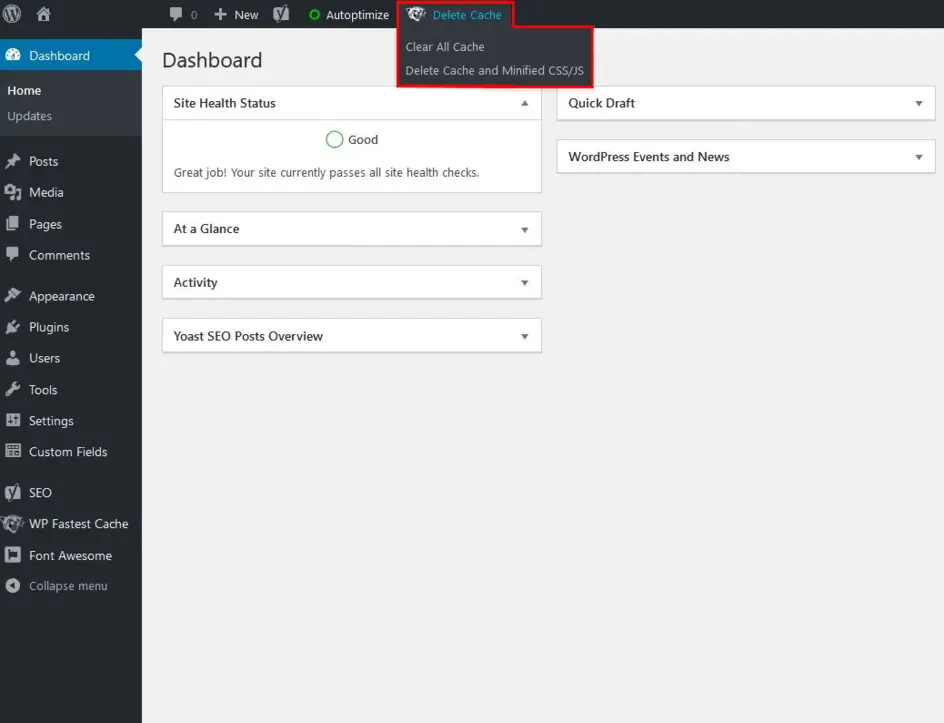
To clear all cache:
- In the WordPress left sidebar, click WP Fastest Cache
- Click the Delete Cache tab
- Click the Clear All Cache button
Via the admin bar: Click Delete Cache → Clear All Cache
If display issues persist after clearing, click Delete Cache and Minified CSS/JS — this also removes minified files that may be out of date after a CSS or JavaScript change.
Tip: WP Fastest Cache offers an option to exclude specific pages or user groups from caching. This is useful for WooCommerce stores where cart and checkout pages must never be cached.
compare WordPress cache plugins
Clear WordPress Cache via Your Hosting Control Panel
Managed WordPress hosting providers often layer their own server-level caching on top of (or instead of) a cache plugin. This host-managed cache operates independently from your plugin’s cache — purging one doesn’t automatically flush the other.
Here’s how to clear the server cache on the four most widely used managed WordPress hosts:
SiteGround (SG Optimizer)
SiteGround uses its own proprietary cache system called SuperCacher, managed through the SG Optimizer plugin in your WordPress dashboard.
Method 1 — From WordPress dashboard:
- Go to SG Optimizer in the WordPress left sidebar
- Click Caching
- Click Purge Dynamic Cache
Method 2 — From SiteGround Site Tools:
- Log in to your SiteGround account
- Go to Site Tools → Speed → Caching
- Click the menu icon next to your domain → Flush Cache
Tip: If you’re not seeing updates live after clearing the SG Optimizer cache, also check if you have a separate CDN cache running (SiteGround offers Cloudflare integration) — you may need to purge that too.
WP Engine
WP Engine uses its own EverCache system. Cache clearing is available both from your WP Engine User Portal and from within WordPress.
Method 1 — From WP Engine User Portal:
- Log in to my.wpengine.com
- Click Installs and select your site
- Click the Caching tab in the left menu
- Click Clear All Caches
Method 2 — From WordPress admin bar:
- Log in to your WordPress dashboard
- Click WP Engine in the admin bar at the top
- Select Purge Cache
Tip: WP Engine’s cache is very aggressive by design. If you’re debugging a change that isn’t showing, always clear the WP Engine cache through the portal — browser-level cache clearing alone won’t help.
Kinsta
Kinsta uses a full-page cache built on Nginx with Redis for object caching. Cache clearing is straightforward from the MyKinsta dashboard.
Method 1 — From MyKinsta:
- Log in to my.kinsta.com
- Click Sites and select your site
- Click the Tools tab
- Under Site Cache, click Clear Cache
Method 2 — From WordPress admin bar:
Kinsta adds a cache button to the WordPress admin bar. Click Kinsta → Clear Cache while viewing any page of your site.
Tip: Kinsta’s cache is automatically cleared when you publish new content, update plugins, or make theme changes — manual clearing is mainly needed when you’ve made database-level changes or custom code edits.
Bluehost
From the WordPress dashboard:
- Click Bluehost in the WordPress left sidebar
- Click Caching
- Click Clear Cache
Tip: Cache management options may vary based on your specific Bluehost plan. Managed WordPress plans include more robust caching controls than basic shared hosting plans.
How to Clear WordPress Cache Without a Plugin
If you don’t have a cache plugin installed, or if plugin-based clearing fails, you can clear cached files directly through FTP access or SSH.
Via FTP (FileZilla or Similar)
Most WordPress caching plugins store their cached files in the wp-content/cache/ directory. Removing the contents of that folder wipes the page cache without requiring access to WordPress admin at all.
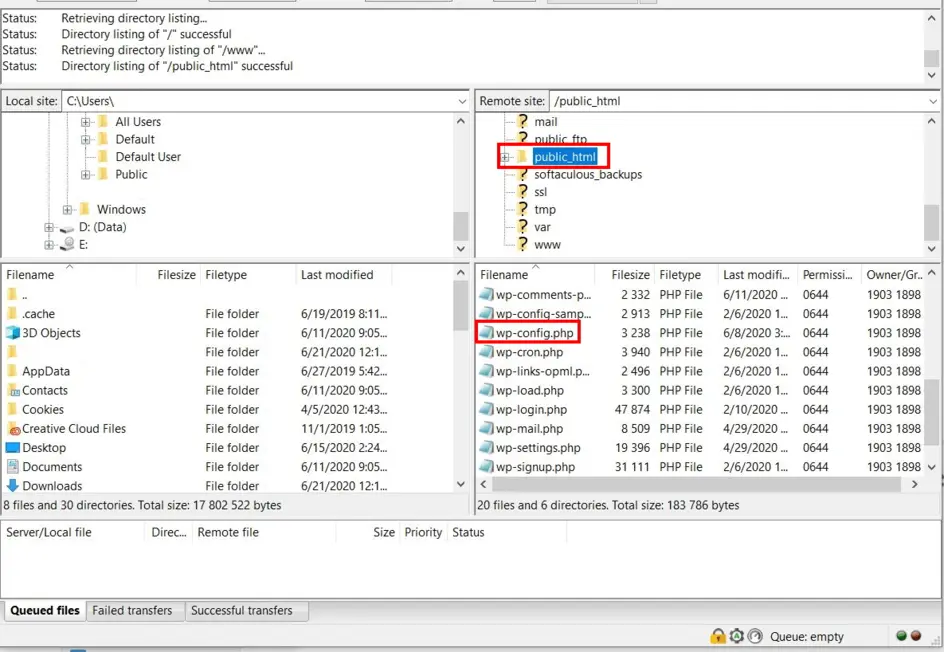
Steps:
- Open your FTP client (FileZilla, Cyberduck, or similar) and connect to your server using your FTP credentials
- In the remote server panel, navigate to your WordPress root folder
- Open wp-content → cache
- Select all files and folders inside the
cache/directory - Delete them
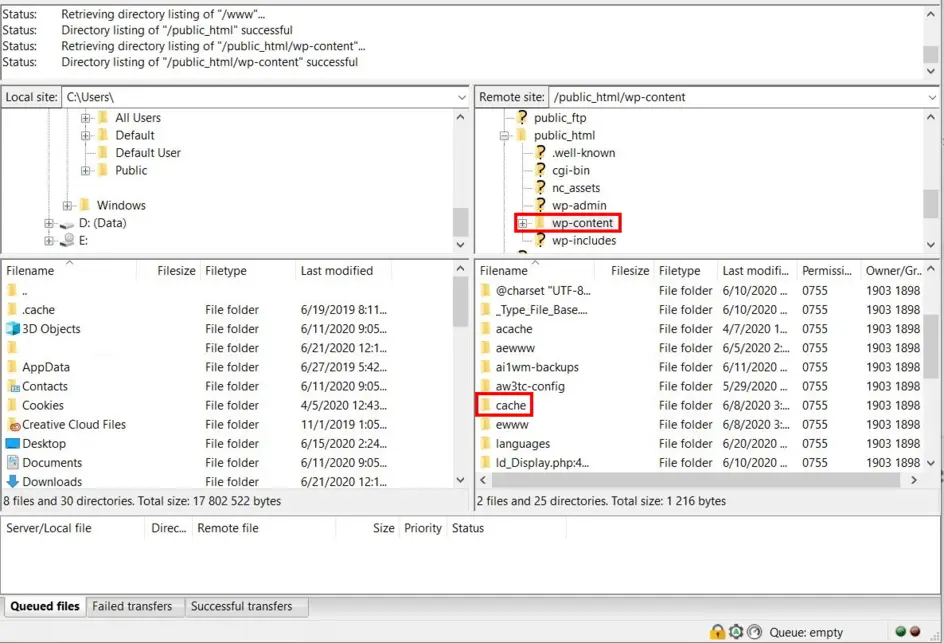
Important: Delete the contents of the cache folder, not the folder itself. WordPress and your cache plugin expect the cache/ directory to exist. Deleting the folder can cause errors until it’s recreated.
To disable caching entirely via FTP: Open wp-config.php (in your WordPress root folder) and add this line before the line reading /* That's all, stop editing! */:
define('ENABLE_CACHE', false);Tip: FTP clearing only removes the static file cache. If you’re using an object cache (Redis/Memcached), those are in memory and need to be flushed separately via WP-CLI or your hosting dashboard.
Via WP-CLI / SSH (For Developers)
WP-CLI is WordPress’s command-line interface. If you have SSH access to your server, WP-CLI provides the most powerful and scriptable cache management options available — ideal for developers, automated deployments, and maintenance scripts.
Basic cache flush command:
wp cache flushThis flushes the WordPress object cache (Redis, Memcached, or the default transient cache). When successful, it returns: “Success: The cache was flushed.” (WP-CLI documentation)
Plugin-specific WP-CLI commands:
| Command | What It Does |
|---|---|
wp cache flush |
Flushes the WordPress object cache (Redis/Memcached/default) |
wp super-cache flush |
Clears all WP Super Cache static files |
wp w3-total-cache flush all |
Clears all W3 Total Cache caches (page, object, DB) |
wp litespeed-purge all |
Purges all LiteSpeed Cache files |
wp cache delete <key> [<group>] |
Deletes a specific cached object by key |
Important for multisite: On multisite installations using persistent object cache (Redis/Memcached), wp cache flush flushes the cache for all sites in the network simultaneously. Use the --url parameter to target a specific site: wp cache flush --url=https://yoursite.com/subsite
Tip: Add wp cache flush to your deployment scripts so cache is automatically cleared every time you push a code change to production — no manual step required.
WP-CLI commands for WordPress management
Browser Cache vs WordPress Cache: Two Different Problems
Clearing your WordPress cache but still seeing the old version? Your browser might be the issue, not your server. Browser cache and WordPress (server-side) cache are completely separate, and one doesn’t affect the other.
Browser cache is stored on your local device. When you visit a website, your browser downloads assets like CSS files, images, and JavaScript locally so the page loads faster on your next visit. When you update your site’s design or CSS, your browser may keep serving the locally cached version instead of fetching the new files from the server.
WordPress cache is stored on your web server. It’s a static snapshot of your page’s HTML output that your server delivers to all visitors. When you update a post or change site content, the server-side cache may continue serving the old snapshot until you clear it.
To clear your browser cache:
- Chrome: Settings → Privacy and Security → Clear browsing data → check “Cached images and files” → Clear data
- Firefox: Settings → Privacy & Security → Cookies and Site Data → Clear Data → check “Cached Web Content” → Clear
- Safari: Develop menu → Empty Caches (or Safari menu → Clear History)
To force-refresh a single page without clearing your entire browser cache:
- Windows/Linux: Ctrl+Shift+R or Ctrl+F5
- Mac: Cmd+Shift+R
This tells your browser to ignore its local cache and fetch a fresh copy directly from the server — useful for quickly checking if a change is live without clearing all your browsing data.
Does Clearing WordPress Cache Affect SEO?
Clearing WordPress cache does not negatively affect your SEO rankings. Search engines like Google crawl your actual web pages, not your cached files. When you clear the cache, Googlebot sees the same content it would see on any fresh visit — just without a cached layer in between.
In fact, keeping cache cleared of stale content can benefit SEO in specific ways: when you’ve made significant content updates or added structured data, clearing the cache ensures that Googlebot indexes your latest changes quickly rather than seeing an outdated cached version.
The brief window while your cache rebuilds after a purge — during which pages load slightly slower from scratch — is too short to meaningfully affect ranking signals. Google doesn’t penalize a site for a brief spike in load time during routine maintenance.
What can hurt SEO is accidentally disabling cache entirely rather than just clearing it. An uncached WordPress site without any performance optimization will be noticeably slower, and page speed is a confirmed Google ranking factor. Verify that your cache plugin is re-enabled and functioning after any troubleshooting session.
Which Cache Plugin Should You Use?
The right cache plugin depends on your hosting environment, technical comfort level, and budget:
| Plugin | Best For | Price | Ease of Use | Auto-Clear on Publish |
|---|---|---|---|---|
| LiteSpeed Cache | Sites on LiteSpeed/OpenLiteSpeed servers (many shared hosts); best free option overall | Free | Easy | ✅ Yes |
| WP Rocket | Non-technical users, agencies, WooCommerce stores that want maximum performance with minimal setup | $59/year (1 site) | Very Easy | ✅ Yes |
| WP Super Cache | Beginners on any host; maintained by Automattic for long-term stability | Free | Easy | ⚠️ Manual or config required |
| W3 Total Cache | Developers who need granular control over page, object, database, and browser caching | Free / Pro | Complex | ✅ With configuration |
| WP Fastest Cache | Small-medium sites that need fast, simple setup with auto-clear on publish | Free / Premium | Easy | ✅ Yes |
Source: WordPress.org plugin directory, wp-rocket.me/pricing/ — March 2026
If you’re on a LiteSpeed-powered host (common with Hostinger, NameHero, and many cPanel-based hosts), LiteSpeed Cache is the strongest free choice. For everyone else without a specific server requirement, WP Rocket is the easiest path to excellent performance; LiteSpeed Cache is the best free option.
explore more WordPress guides at wplasma.com
FAQ — Frequently Asked Questions
Why is my WordPress cache not clearing?
A few common reasons: your caching plugin may have multiple cache layers (page cache, object cache, browser cache) and you’ve only cleared one. If you’re on managed hosting like SiteGround or WP Engine, the host’s server-level cache is separate from your plugin’s cache — you need to clear both. Also check that caching is actually enabled in your plugin; if it was accidentally disabled, there’s nothing to clear.
How often should I clear my WordPress cache?
You don’t need to clear it on a schedule. Clear your cache reactively — after updates, content changes, or when debugging display issues. Most cache plugins handle this automatically: LiteSpeed Cache and WP Rocket both purge the relevant cache automatically after you publish a post or update a plugin. Manual clearing is mainly needed when something looks wrong.
What is the difference between page cache and object cache?
Page cache stores the static HTML output of your WordPress pages so they can be delivered to visitors without re-executing PHP or querying the database. Object cache (Redis, Memcached) stores the results of database queries in memory so repeated queries don’t hit the database repeatedly. They serve different layers of performance optimization and need to be cleared separately — wp cache flush in WP-CLI clears the object cache, while your plugin’s “Clear Cache” button typically handles page cache.
Does clearing WordPress cache delete my content?
No. Cache is a temporary copy of your content — clearing it removes the copy but leaves your original content in the database completely untouched. WordPress will regenerate fresh cached files on the next page visit.
How do I clear cache for a specific page only?
Most cache plugins support selective clearing. In WP Rocket and LiteSpeed Cache, you can visit the specific page while logged in and use the admin bar button to “Clear cache for this URL” (exact label varies by plugin). In WP Super Cache, go to Settings → WP Super Cache → Contents tab and delete cached files for specific URLs.
Why do I need to clear both WordPress cache and browser cache?
Because they’re stored in different places. WordPress cache lives on your web server. Browser cache lives on your visitor’s device. Clearing one doesn’t affect the other. If you’ve cleared the WordPress page cache but are still seeing old content, your browser is likely serving a locally stored copy — force-refresh with Ctrl+Shift+R (Windows) or Cmd+Shift+R (Mac) to bypass it.
Can I clear WordPress cache automatically?
Yes. All major cache plugins support automatic cache clearing on post publish, plugin updates, and theme updates. WP Rocket and LiteSpeed Cache do this out of the box. In W3 Total Cache, you need to configure it under Performance → Page Cache settings. You can also automate cache clearing via WP-CLI in deployment scripts: add wp cache flush to run after each code deployment.
What happens if I don’t clear the WordPress cache?
Visitors continue seeing the old, cached version of your site — including outdated content, broken layouts after a plugin update, or design changes that appear stuck. In most cases this is a cosmetic issue that resolves itself when the cache expires naturally (usually 24 hours, depending on your plugin’s settings). However, in cases where a security fix was deployed or a major bug was corrected, stale cache can expose visitors to the problem longer than necessary.
Is WP Rocket worth the price for cache management?
It depends on your context. WP Rocket’s price of $59/year for one site is justified if you value ease of setup and the additional performance features (Remove Unused CSS, Delay JavaScript, image lazy loading) that free plugins don’t include. For developers comfortable with configuration, W3 Total Cache or LiteSpeed Cache can achieve similar performance results for free. For non-technical users or agencies managing client sites, WP Rocket’s simpler interface typically saves enough time to justify the cost.
How do I clear cache on a WordPress multisite?
On WordPress multisite, cache clearing behavior depends on your setup. From the Network Admin, most cache plugins add a “Purge All” option that clears cache across all sites in the network. Via WP-CLI, use wp cache flush --url=https://yournetwork.com/subsite to target a specific site, or run wp cache flush from the network root to flush the entire object cache. Note that on networks using Redis or Memcached persistent object cache, flushing from one site may flush the cache for all network sites.
Key Takeaways
Clearing WordPress cache is a routine maintenance task that solves the majority of “my changes aren’t showing up” problems. The right method depends on your setup:
- If you have a cache plugin, the admin bar button is the fastest path — it works for LiteSpeed Cache, WP Rocket, WP Super Cache, W3 Total Cache, and WP Fastest Cache
- If you’re on a managed host (SiteGround, WP Engine, Kinsta), clear the host’s server cache from their dashboard in addition to any plugin cache
- If you still see the old version after clearing WordPress cache, your browser cache may be the issue — force-refresh with Ctrl+Shift+R or Cmd+Shift+R
- For developers,
wp cache flushvia WP-CLI handles object cache and works well in automated deployment pipelines
Setting up auto-clear on publish in your cache plugin of choice eliminates most of the manual clearing work entirely — making cache management something that happens in the background rather than a step you need to remember.