

Quick Summary (BLUF)
This WordPress SEO checklist organizes every optimization task into four phases: Foundation Setup, On-Page SEO, Technical SEO, and Ongoing Monitoring. Whether you just installed WordPress or have been running your site for years, working through these phases in order gives you a clear path from zero visibility to consistent organic traffic.
- Phase 1 (Setup): Configure WordPress, install an SEO plugin, connect Google tools, and create your sitemap — do this once before publishing anything.
- Phase 2 (On-Page): Apply keyword research, optimize meta tags, structure headings, write alt text, and add internal links — do this for every page and post.
- Phase 3 (Technical): Secure your site with HTTPS, optimize page speed, fix broken links, and configure caching — do this site-wide.
- Phase 4 (Ongoing): Monitor rankings, update old content, and track backlinks — do this monthly or quarterly.
Time commitment: Phase 1 takes about 2–4 hours. Phase 2 adds 30–60 minutes per piece of content. Phases 3 and 4 require periodic attention rather than constant work.
Who Should Use This WordPress SEO Checklist
WordPress handles more than 40% of all websites on the internet, which means competition in nearly every niche is substantial. Having a good-looking site is no longer enough — search engines need to understand what your pages are about, and visitors need to find you before they can read anything you have written.
This checklist is designed for:
- Bloggers launching or relaunching a site — get your foundation right before Google crawls your content
- Small business owners managing WordPress themselves — no developer required for most of these tasks
- Entrepreneurs building organic traffic — reduce dependence on paid ads by investing in long-term search visibility
- Developers handing off a site — a structured handoff checklist for ensuring the site is search-ready
You do not need to be a technical expert to follow this checklist. Most tasks are handled through SEO plugins, your WordPress dashboard, and free Google tools. The few technical steps are clearly marked and explained.
Phase 1: Foundation Setup (Do This Before Publishing)
Getting the foundation right saves you from fixing costly mistakes later. A site that accidentally blocks search engines, uses messy URL structures, or lacks a sitemap can undermine months of content work. These setup tasks typically take a few hours and most are done only once.

1.1 Check Your WordPress Search Engine Visibility Setting
WordPress includes a built-in option to block search engines from crawling your site. It is intended for use during development, but many sites go live with it still enabled — a mistake that prevents your site from appearing in Google entirely.
Go to Settings > Reading in your WordPress dashboard and scroll to “Search engine visibility.” Make sure the box labelled “Discourage search engines from indexing this site” is unchecked. If it is checked, uncheck it and save your settings immediately.
1.2 Configure SEO-Friendly Permalinks
WordPress defaults to ugly URLs like yoursite.com/?p=123. These tell search engines nothing about your content. Change this to the Post name structure, which produces clean URLs like yoursite.com/wordpress-seo-checklist/.
Go to Settings > Permalinks and select Post name. Save changes. Do this before publishing any content — changing permalinks on an existing site requires setting up redirects for old URLs, which adds extra work.
1.3 Install an SEO Plugin
WordPress does not include built-in tools for managing meta titles, meta descriptions, XML sitemaps, or schema markup. An SEO plugin fills all these gaps without requiring any code. All four major options below are trusted by millions of sites and offer solid free tiers.
WordPress SEO Plugin Comparison
| Plugin | Free Tier Highlights | Paid Tier Highlights | Best Known For | Ease of Use |
|---|---|---|---|---|
| Yoast SEO | On-page analysis, meta editor, XML sitemap, basic schema, breadcrumbs | Redirect manager, multiple focus keywords, internal linking suggestions | Traffic-light content scoring (red/orange/green) | Beginner-friendly |
| All in One SEO (AIOSEO) | Meta editor, sitemap, schema, social media meta tags | Link assistant, local SEO, WooCommerce SEO, headline analyzer | TruSEO score, link assistant feature | Beginner-friendly |
| SEOPress | Meta editor, sitemap, image SEO, content analysis, GA integration (no ads) | Redirections, WooCommerce SEO, local SEO, advanced schema, GSC integration | Lightweight, ad-free free version | Intermediate |
| Rank Math | On-page SEO, schema, redirections, 404 monitor, analytics integration | Keyword rank tracking, content AI, advanced schema builder | Most generous free tier (includes redirects and 404 monitor) | Intermediate |
All four plugins accomplish the core tasks. The differences come down to interface preference and which advanced features matter most to you. If you are starting out, Yoast SEO and AIOSEO both have guided setup wizards that walk you through the initial configuration.
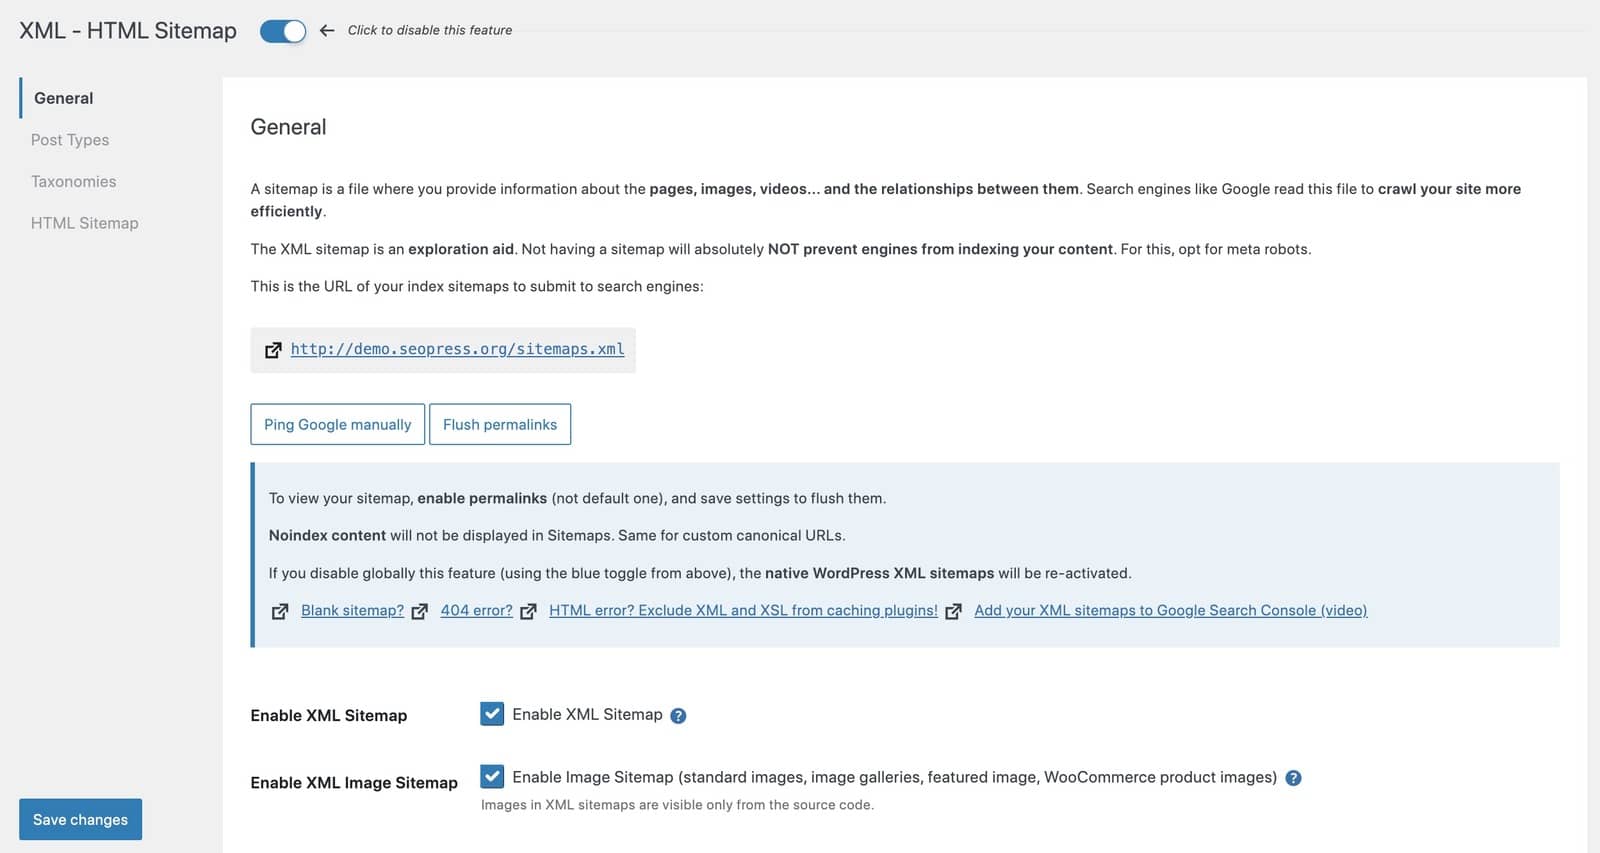
1.4 Create and Submit an XML Sitemap
An XML sitemap is a file that lists all the important pages on your site. It tells Google’s crawlers where to look, which helps new content get discovered and indexed faster. Most SEO plugins generate a sitemap automatically — you just need to find the URL (usually yoursite.com/sitemap.xml or yoursite.com/sitemap_index.xml) and submit it to Google Search Console.
1.5 Connect Google Search Console
Google Search Console (GSC) is a free tool that shows how your site performs in Google Search. It reports which queries bring visitors to your site, which pages are indexed, any crawl errors, and your Core Web Vitals scores. After installing your SEO plugin, most plugins can handle GSC verification for you — or you can add the HTML verification tag manually to your site header.
Once connected, navigate to Sitemaps in Google Search Console and submit your sitemap URL. This is the fastest way to tell Google about all your pages at once.
1.6 Set Up Google Analytics (GA4)
Google Analytics tracks what visitors do after they arrive on your site — which pages they read, how long they stay, and what traffic source brought them there. For SEO purposes, the most important segment to monitor is organic search traffic, which tells you whether your SEO efforts are producing results. Most WordPress sites connect GA4 using either their SEO plugin or a dedicated analytics plugin.
Phase 2: On-Page SEO (Apply to Every Page and Post)
On-page SEO is the work you do for each individual piece of content. Unlike setup tasks that you do once, on-page optimization is part of your publishing workflow for every page, product, and blog post. Building these habits early means every piece of content you publish is search-optimized from day one.
2.1 Do Keyword Research Before You Write
Keyword research answers a simple question: what words does your target audience type into Google when looking for content like yours? Skipping this step means writing content that might be excellent but invisible — nobody searching for the topic will find it because the words you used do not match what they searched for.
The most effective rule is one primary keyword per page. When multiple pages target the same keyword, search engines cannot determine which page to rank, which splits your authority and can hurt both pages.
Free approaches to keyword research include:
- Google Autofill — start typing your topic in Google’s search bar and note the suggested completions
- Related Searches — scroll to the bottom of Google’s results page to see related search terms
- People Also Ask — the expandable questions Google shows mid-results often reveal high-intent long-tail queries
- Google Keyword Planner — free with a Google Ads account, shows monthly search volumes
2.2 Write an Optimized Meta Title and Meta Description
Your meta title is the blue clickable headline that appears in Google search results. Your meta description is the short paragraph below it. Both are set in your SEO plugin’s metabox at the bottom of the post editor.
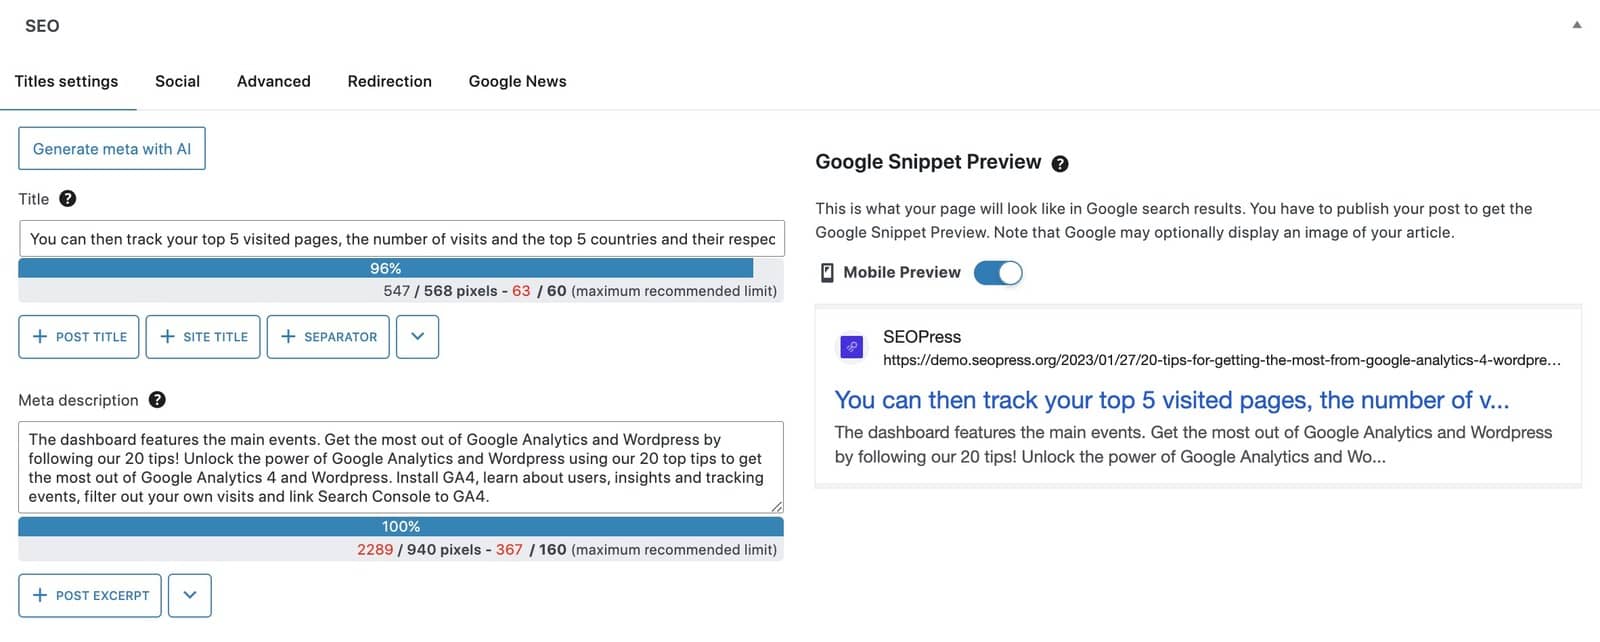
Key guidelines for meta tags:
- Meta title: keep it under 55–60 characters (Google technically measures in pixels, not characters, but this character range is a reliable safe zone). Include your primary keyword near the beginning.
- Meta description: aim for 120–155 characters. Write a compelling summary that includes the keyword naturally and gives readers a reason to click. Google does not use meta descriptions as a direct ranking factor, but a well-written description improves your click-through rate.
- Avoid duplicate meta tags — every page should have a unique title and description.
2.3 Use Short, Keyword-Rich URLs
A clean URL like yoursite.com/wordpress-seo-checklist is easier for both humans and search engines to read than yoursite.com/p=5512&cat=3. WordPress lets you edit the URL slug directly beneath the post title in the editor.
Best practices for URL slugs:
- Include the primary keyword
- Keep it short — ideally 3–5 words
- Use hyphens to separate words (not underscores)
- Remove stop words like “a”, “the”, “and” if they add length without adding meaning
- Do not include the date unless your content is specifically news or time-bound
2.4 Structure Content with Proper Heading Tags
Heading tags (H1, H2, H3) tell both readers and search engines how your content is organized. Use only one H1 per page — it should be your post title and contain your primary keyword. Use H2s for major sections and H3s for sub-points within those sections.
Good heading structure does two things: it makes your content easy to scan (most readers skim before they commit to reading), and it gives search engines a clear map of what each section covers, which helps with ranking for related terms beyond your primary keyword.
2.5 Build Content That Demonstrates E-E-A-T
E-E-A-T stands for Experience, Expertise, Authoritativeness, and Trustworthiness. Google’s quality evaluators use these criteria to assess content quality, and pages that clearly demonstrate these qualities tend to earn stronger rankings over time — particularly for topics related to health, finance, and major life decisions.
For practical application on any WordPress site:
- Experience: Include first-hand observations, examples, or opinions that only someone who has actually worked with the topic would know
- Expertise: Create author bio pages that describe credentials and background; link to them from your posts
- Authoritativeness: Cite credible sources; earn backlinks from relevant sites in your field
- Trustworthiness: Use HTTPS, keep your About and Contact pages current, and be transparent about who is behind your site
2.6 Optimize Every Image You Publish
Images affect SEO in two ways: through alt text (which tells search engines what the image shows) and through file size (which affects page load speed). Both matter for rankings.
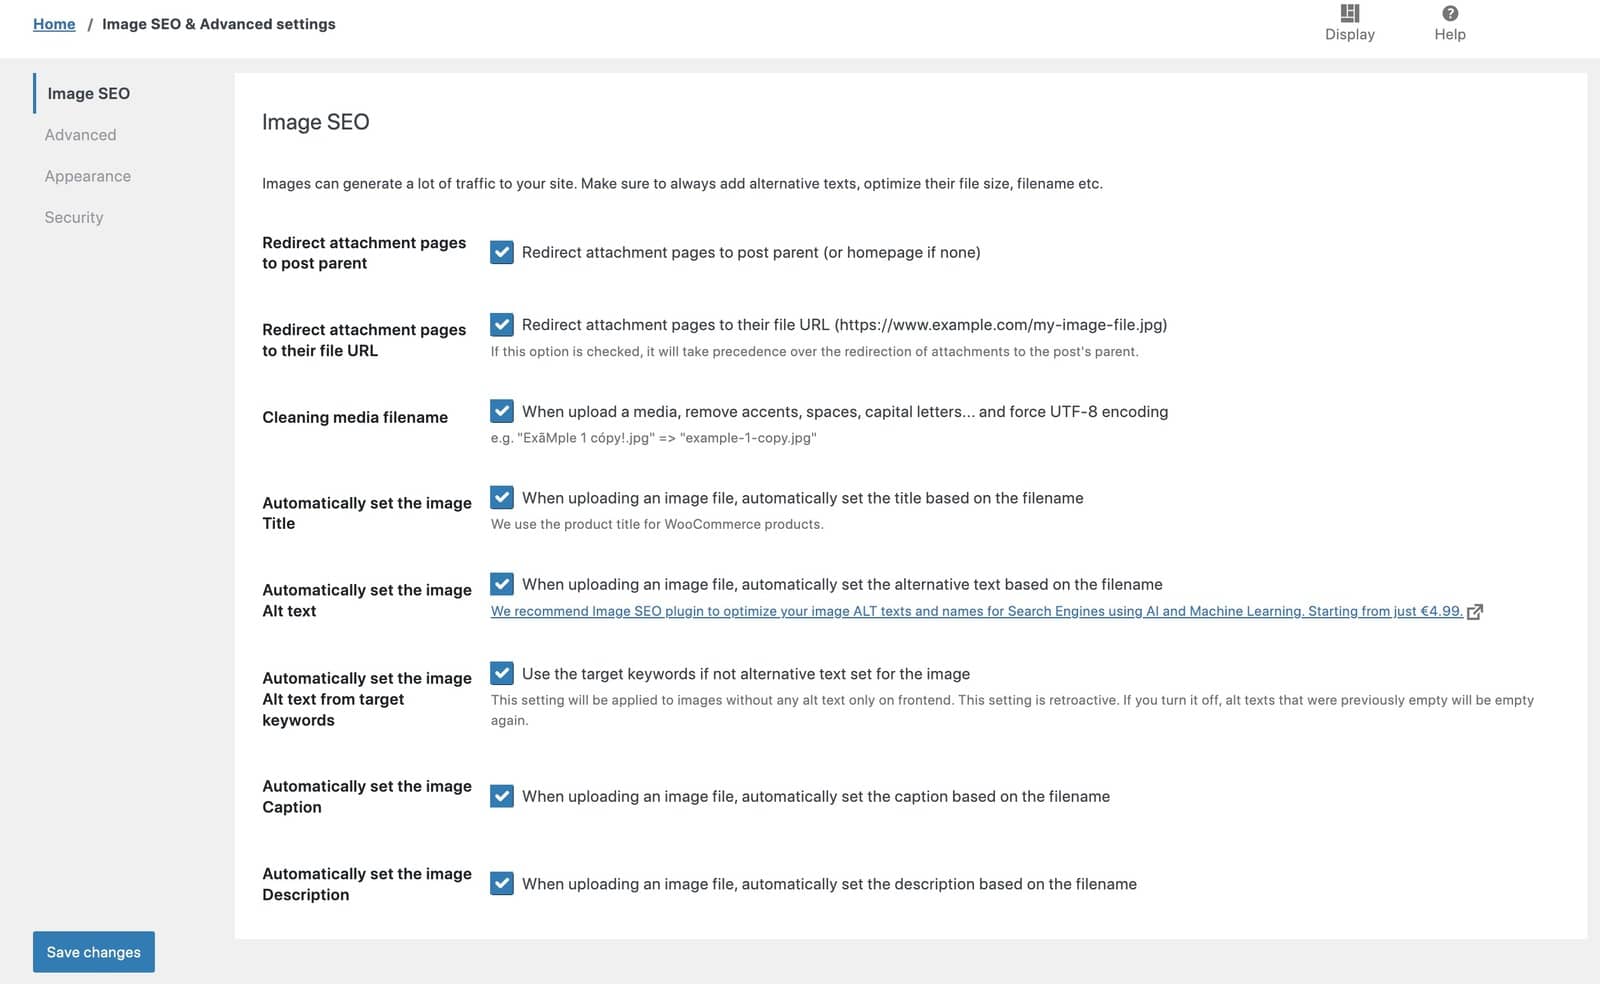
For each image you upload:
- File name: rename the file before uploading to something descriptive, such as
wordpress-seo-checklist-screenshot.jpgrather thanIMG_4421.jpg - Alt text: write a concise description of what the image shows; include your keyword where it fits naturally, but do not force it
- File size: compress images before uploading; aim for under 200KB for most web images. Tools like Squoosh or TinyPNG work for manual compression; image optimization plugins handle this automatically
- Format: WebP format offers better compression than JPEG or PNG for most web images without noticeable quality loss
2.7 Add Internal Links Strategically
Internal links connect your pages to each other, which helps search engines crawl your entire site and understand how your content is related. They also distribute authority — pages with many internal links pointing to them receive a stronger signal from Google about their importance.
A practical target is 2–4 internal links per post, pointing to related content on your own site. When you publish something new, also go back to older related posts and add a link pointing to the new content. This is called building your , and it is one of the most underrated on-page SEO tasks.
Watch out for orphan pages — content that has no internal links pointing to it. These pages are difficult for search engines to discover and tend to rank poorly regardless of their content quality.
2.8 Add Schema Markup
Schema markup is structured data embedded in your page code that tells search engines exactly what type of content a page contains. Adding the right schema can earn your page rich results in Google — star ratings, FAQ dropdowns, How-To steps, and other visual enhancements that significantly increase your visibility and click-through rate.
Your SEO plugin handles most schema needs without requiring code. Common schema types for WordPress sites include: Article (for blog posts), FAQPage (for FAQ sections), LocalBusiness (for local services), Product (for WooCommerce), and HowTo (for tutorial content).
Phase 3: Technical SEO (Site-Wide Optimization)
Technical SEO addresses the infrastructure of your site — the elements that affect whether search engines can crawl and index your content efficiently, and whether visitors have a fast, reliable experience. Most technical tasks are done once and then monitored periodically rather than revisited constantly.

3.1 Confirm Your Site Uses HTTPS
HTTPS encrypts the connection between your server and visitors, protecting any data they submit through your site. Google confirmed HTTPS as a ranking signal in 2014, and browsers now flag HTTP sites as “Not Secure” in the address bar — which erodes visitor trust and increases bounce rates.
Check your site by looking at the address bar: a padlock icon confirms HTTPS is active. Most web hosts provide free SSL certificates through Let’s Encrypt. If your site still runs on HTTP, contact your host for instructions on enabling SSL, then update your WordPress URL settings and set up a redirect from HTTP to HTTPS.
3.2 Optimize for Core Web Vitals
Core Web Vitals are Google’s official page experience metrics, measured for real users across your site. They became ranking signals in 2021, and Google updates them over time — most recently replacing the FID metric with INP (Interaction to Next Paint) in March 2024.
The three metrics to target:
- LCP (Largest Contentful Paint): how long the main content takes to load. Target: under 2.5 seconds. Main culprits: large uncompressed images, slow hosting.
- INP (Interaction to Next Paint): how quickly your site responds to user interactions. Target: under 200ms. Main culprits: heavy JavaScript, poorly coded plugins.
- CLS (Cumulative Layout Shift): how much the page layout shifts while loading. Target: under 0.1. Main culprits: images without specified dimensions, ads loading late.
Run your site through Google PageSpeed Insights (pagespeed.web.dev) or Google Lighthouse in Chrome DevTools to get scores and specific improvement recommendations. Focus on the “Opportunities” section — these are the fixes with the highest impact.
3.3 Ensure Your Site Is Mobile-Friendly
Google indexes the mobile version of your site first, before the desktop version. This is called mobile-first indexing, and it means a site that is hard to use on a phone will rank lower than one that is not — even for desktop searches.
Most modern responsive WordPress themes handle mobile layout automatically. If your site was built on an older theme, test it using the Mobile tab in Google PageSpeed Insights or Chrome’s DevTools. Common fixes include using a responsive theme, ensuring tap targets (buttons and links) are large enough to tap, and compressing images to reduce mobile load times.
3.4 Fix Broken Links and Manage Redirects
Broken links — URLs that return a 404 error — hurt both user experience and search engine crawlability. When a search engine hits a 404, it cannot follow that link path further. Research suggests a significant proportion of links on the web decay over time as pages move or are deleted.
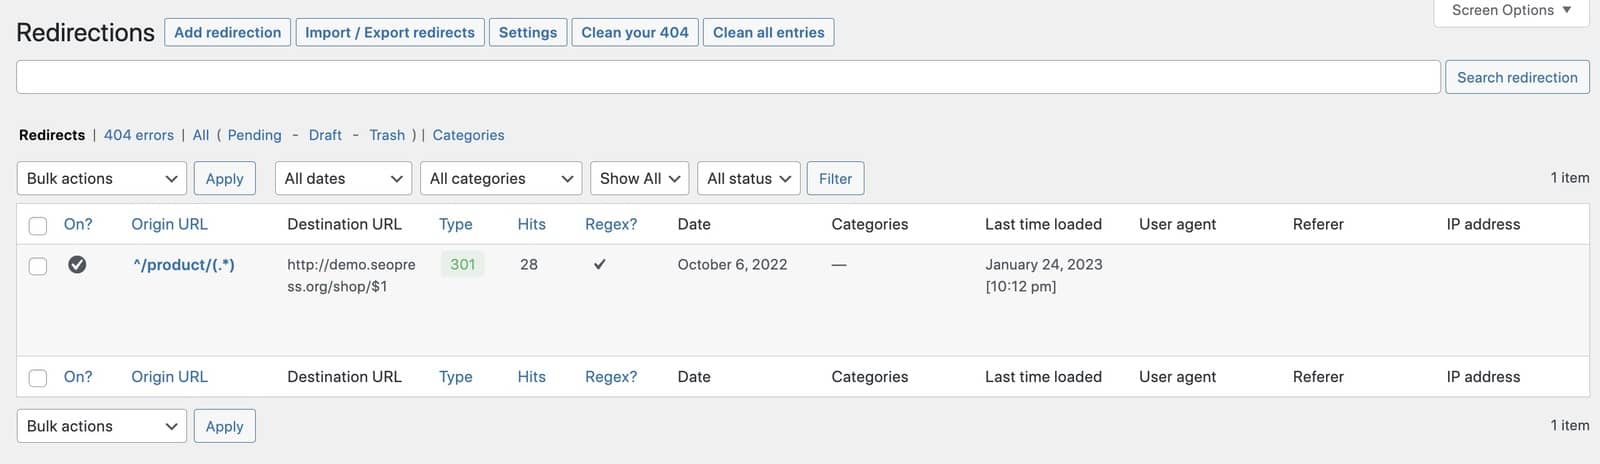
When you change a page URL, always set up a 301 redirect from the old URL to the new one. A 301 redirect tells search engines the move is permanent and transfers the ranking authority of the old URL to the new one. A 302 redirect signals a temporary move and does not transfer authority. Most SEO plugins include a redirect manager — use it every time you update a slug.
3.5 Enable Caching
Caching stores pre-built versions of your pages so the server does not have to regenerate them for every visitor. This reduces your server’s Time to First Byte (TTFB) and speeds up page delivery — which directly improves your Core Web Vitals scores and user experience.
Widely used WordPress caching plugins include WP Rocket (premium), W3 Total Cache (free), and LiteSpeed Cache (free, requires LiteSpeed server). Your host may also provide server-level caching, which is typically faster than plugin-based caching.
3.6 Check Your Robots.txt File
The robots.txt file at yoursite.com/robots.txt tells search engine crawlers which parts of your site to crawl and which to skip. WordPress generates a basic robots.txt by default that blocks /wp-admin/ (correct) but allows everything else.
One important thing to verify: make sure /wp-content/uploads/ is not blocked. Blocking this directory prevents search engines from indexing your images, which cuts off a potential traffic source via Google Images.
Phase 4: Ongoing SEO (Monthly and Quarterly Tasks)
SEO is not a one-time project. The sites that earn sustainable organic traffic treat SEO as a recurring practice rather than a launch checklist. Phase 4 covers the tasks that should be part of your regular workflow — not daily, but often enough to catch problems early and build on momentum.
4.1 Monitor Performance in Google Search Console
Review Google Search Console at least monthly. The Performance report shows your top queries (what people searched before clicking your site), which pages receive the most impressions and clicks, and your average position in search results.
Look for pages with high impressions but low click-through rates — these are pages Google is showing but users are not clicking. Usually, improving the meta title or description is enough to significantly increase clicks without any change to the content itself.
4.2 Audit and Update Old Content
Content freshness matters. Articles with outdated statistics, deprecated plugin names, or old pricing information lose their rankings over time as users leave quickly and Google interprets that as a quality signal. A quarterly content audit prevents this.
A useful framework for content audits is the RID principle: for each piece of content, decide whether to Retain it as-is, Improve it with updates or expansion, or Delete it (and redirect to a stronger related page). Consolidating thin content into one comprehensive page often performs better than keeping multiple weak pages on the same topic.
4.3 Build and Monitor Your Backlink Profile
Backlinks — links from other websites pointing to yours — remain one of Google’s strongest ranking signals. You cannot buy quality backlinks safely, but you can earn them by creating genuinely useful content, participating in your industry community, submitting your site to relevant directories, and contributing to other publications.
To monitor your backlink profile: in Google Search Console, go to Links > Top linking sites. For a more detailed analysis, tools like Ahrefs, Semrush, or Moz offer free-tier backlink reports. Watch for a sudden loss of backlinks (which can signal a domain change or site restructure that needs redirects) or an unusual spike in low-quality links.
4.4 Track Core Web Vitals Over Time
Your Core Web Vitals scores are not static — plugin updates, theme changes, new images, and traffic spikes can all cause them to shift. Google Search Console includes a dedicated Core Web Vitals report under Experience that shows whether pages are passing or failing over time. Review this report monthly, especially after major site updates.
Frequently Asked Questions
What is a WordPress SEO checklist?
A WordPress SEO checklist is a structured list of optimization tasks that help your WordPress site rank higher in search engine results. It covers everything from initial setup (permalink structure, SEO plugins) to ongoing tasks (content updates, backlink monitoring). Using a checklist ensures you do not overlook steps that have a significant impact on search visibility.
Is WordPress good for SEO?
Yes. WordPress is generally considered one of the most SEO-friendly website platforms available. It generates clean, semantic HTML, allows full control over URLs and meta tags, and has a large ecosystem of SEO plugins that handle technical tasks automatically. Most SEO best practices can be implemented without writing any code. That said, WordPress does not optimize itself — you still need to follow the practices in this checklist to see meaningful results.
Do I need an SEO plugin for WordPress?
WordPress does not include meta tag management, XML sitemaps, or schema markup out of the box, so an SEO plugin fills those gaps. Technically, you could add this functionality through custom code, but an SEO plugin is far easier to maintain and update. The free versions of Yoast SEO, AIOSEO, SEOPress, and Rank Math all cover the core requirements for most sites.
How long does it take to see SEO results in WordPress?
Established sites with existing authority may see ranking changes within a few weeks of making optimization changes. New sites typically take 3–6 months of consistent publishing before organic traffic becomes significant. The timeline depends on your niche’s competition, how often you publish, the quality of your content, and how many backlinks your site earns. SEO compounds over time — consistent effort for a year produces results that a one-month sprint cannot replicate.
What is E-E-A-T and does it affect my WordPress site?
E-E-A-T stands for Experience, Expertise, Authoritativeness, and Trustworthiness. Google’s quality evaluators use these criteria to assess whether content is genuinely helpful and produced by qualified creators. While E-E-A-T is not a direct algorithmic ranking signal in the same way that backlinks are, it correlates with the measurable signals Google does use — such as backlinks from reputable sites, user engagement, and fresh, accurate content. For WordPress site owners, E-E-A-T translates to having author bio pages, citing credible sources, keeping content current, and demonstrating real experience in your content.
What are Core Web Vitals and why do they matter for SEO?
Core Web Vitals are three metrics Google uses to measure real-world user experience on your site: LCP (loading speed of the main content), INP (how quickly the site responds to interactions), and CLS (how stable the layout is while the page loads). Google confirmed them as ranking signals in 2021. Sites that score poorly on Core Web Vitals can be outranked by competitors with similar content but better performance. Check your scores using Google PageSpeed Insights or the Core Web Vitals report in Google Search Console.
How do I submit my WordPress sitemap to Google?
First, generate your sitemap using your SEO plugin — the URL is typically yoursite.com/sitemap.xml or yoursite.com/sitemap_index.xml (check your plugin settings for the exact URL). Then open Google Search Console, select your property, go to Sitemaps in the left menu, paste your sitemap URL in the “Add a new sitemap” field, and click Submit. Google will process the sitemap and begin crawling the listed pages, though indexing can still take days or weeks depending on your site’s authority.
How do I check if my WordPress site is SEO-optimized?
Several free tools can audit your site’s current SEO status. Google Search Console shows indexing coverage, Core Web Vitals, and which queries your site ranks for. Google PageSpeed Insights evaluates performance and technical issues. The SEO audit feature built into most SEO plugins checks on-page elements like meta tags, heading structure, and image alt text. For a comprehensive baseline check, run your site through all three before starting systematic optimization work.
Putting It All Together
The most important thing to understand about this WordPress SEO checklist is that it represents a process, not a project. The setup tasks in Phase 1 are genuinely one-time work. The on-page tasks in Phase 2 become a habit with each new piece of content. The technical tasks in Phase 3 require periodic checks rather than constant attention. And the ongoing tasks in Phase 4 are what separate sites that plateau from sites that continue growing.
None of these phases are particularly complicated in isolation. The challenge is consistency — returning to the checklist regularly, updating old content before it goes stale, and paying attention to what Google Search Console tells you about what is and is not working.
is the single most impactful first step. From there, each phase builds on the previous one, and over time the cumulative effect of consistent, thoughtful optimization shows up as organic traffic that keeps growing without requiring a paid ad budget to maintain it.