

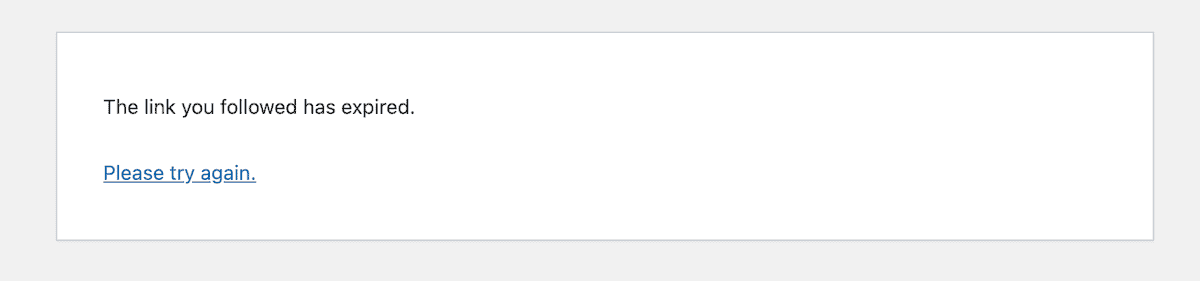
You clicked a button in WordPress — maybe to install a theme, upload a plugin, or save a settings page — and instead of a success message you got: “The link you followed has expired. Please try again.” No error code. No hint at what went wrong. Just that one cryptic sentence.
Here’s the thing most guides miss: this error actually has two completely different root causes. One is a server configuration issue with PHP file size limits. The other is a WordPress security mechanism — called a nonce — that timed out before your request was processed. Both produce the exact same error message, which is why a fix that works for one person doesn’t always work for another. Before touching any files, it helps to understand which situation you’re actually in.
This guide walks through all the causes and every practical fix — including which methods work on different server types and which hosting providers require a support ticket instead of a file edit. If you run into other unexpected messages in your dashboard, our guide to common WordPress errors covers the full range of what you might encounter.
What This Error Actually Means (and When It Appears)
The error message “The link you followed has expired” shows up in a few different scenarios that feel unrelated but share the same WordPress error path. Knowing which scenario applies to you points you to the right fix.
Cause 1: The file you’re uploading exceeds PHP size limits
This is the most common cause. When you try to install a premium theme like Enfold or Divi, or upload a large plugin package, WordPress attempts to send the file through PHP. If the file size exceeds the server’s configured upload limit, PHP terminates the request and WordPress displays the expired link message.
This cause applies specifically when you’re uploading something through the WordPress admin — Plugins → Add New → Upload Plugin, Appearance → Themes → Add New → Upload Theme, or the Media Library.
Cause 2: A WordPress nonce expired before your request went through
WordPress attaches a nonce (a one-time security token) to every admin form and action link. Nonces expire by default within 12–24 hours (source: MalCare). If you opened an admin page, left it sitting in a browser tab for an extended period, and then tried to submit it, the nonce baked into that page may have already expired — and WordPress rejects the request with this error.
Caching plugins make this worse. A caching plugin can store a snapshot of an admin-area page that contains a nonce from the time it was first cached, potentially hours earlier. Every subsequent visit to that cached page delivers an already-stale token.
Cause 3: A plugin conflict
Some plugins interfere with WordPress’s nonce validation or session handling. If you started seeing this error after installing or updating a specific plugin, there’s a good chance it’s triggering the error as a fallback — even though you’re not uploading anything large. This type of error often shows up on settings pages, dashboard widgets, or after plugin updates.
Cause 4: Outdated PHP version or corrupted .htaccess
An outdated PHP version (anything below PHP 7.4 as of 2026, ideally 8.1+) can cause unexpected behavior that surfaces as this error. A corrupted or misconfigured .htaccess file can also interfere with WordPress’s request routing in a way that produces the same message.
Step One — Check Your Current Limits Before Changing Anything
If your error is upload-related, your first move is to see what limits are currently in effect. There are two quick ways to check this without touching any server files.
Method A: Media Library — Go to Media → Add New in your WordPress dashboard. Just below the drag-and-drop upload area, WordPress displays your current “Maximum upload file size.” If you’re trying to install a file larger than this number, that’s your problem.

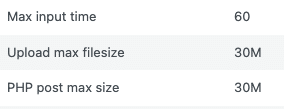
Method B: Site Health — Go to Tools → Site Health → Info tab → Server section. This expands to show you the actual PHP values currently active on your server: upload_max_filesize, post_max_size, memory_limit, max_execution_time, and your PHP version.
Note down the current values before you change anything. This makes it easier to verify your fix worked — and to revert if something goes wrong. For a deeper look at everything Site Health reports, see our WordPress Site Health guide.
Which PHP Settings Control This Error?
Four PHP directives directly affect whether WordPress can complete an upload. They interact with each other, so changing one value without the others often doesn’t solve the problem.
| Setting | What it controls | Rule | Safe starting value |
|---|---|---|---|
upload_max_filesize |
Maximum size of a single uploaded file | Smallest of the three size limits | 64M |
post_max_size |
Maximum total POST request data (file + form fields) | Must be larger than upload_max_filesize | 128M |
memory_limit |
Maximum RAM PHP allocates per script | Must be larger than post_max_size | 256M |
max_execution_time |
Maximum seconds a PHP script can run before timing out | Set high enough for slow uploads | 300 |
max_input_time |
Maximum seconds PHP waits to receive incoming data | Match max_execution_time | 300 |
The hierarchy rule to remember: memory_limit > post_max_size > upload_max_filesize (verified by Kinsta). If you raise upload_max_filesize to 128M but leave post_max_size at 64M, the upload will still fail — PHP rejects the request at the POST level before it ever reaches the file size check. For a full explanation of how memory allocation works in WordPress, see our guide to PHP memory limit in WordPress.
For most WordPress sites, the starting values in the table above work well. Here’s a broader reference based on site type:
| Site Type | upload_max_filesize | post_max_size | max_execution_time |
|---|---|---|---|
| Small blog / personal site | 32M–64M | 64M–128M | 300 |
| Business site with premium plugins | 64M–128M | 128M–256M | 300 |
| WooCommerce store | 64M–128M | 128M–256M | 300 |
| Agency / large media site | 256M | 256M | 300 |
How to Fix This — Choose Your Method Based on Your Access Level
There are five ways to increase PHP limits in WordPress. Which one to try first depends on what kind of server access you have. If you’re not sure, start with Method 1 — it’s the most accessible and requires no file editing.
- Have cPanel access? → Method 1 (MultiPHP INI Editor) — no code required
- On OpenLiteSpeed or Nginx (Kinsta, WP Engine, Cloudways)? → Method 5 or contact support directly
- Have FTP or File Manager but no cPanel? → Method 2 (edit php.ini)
- Can only access WordPress admin? → Method 3 (wp-config.php or functions.php)
- On Apache/LiteSpeed Enterprise with .htaccess access? → Method 4
Fix Method 1 — cPanel MultiPHP INI Editor (No Code Required)
If your host uses cPanel (Bluehost, GoDaddy, Hostinger, DreamHost, and many shared hosts do), the MultiPHP INI Editor lets you change PHP settings through a GUI — no file editing required.
- Log into your hosting account and open cPanel.
- In the search bar, type MultiPHP INI Editor and click it.
- Under Configure PHP INI Basic Settings, select your domain from the dropdown.
- Locate post_max_size and upload_max_filesize. Adjust both to your target values (e.g., 128M and 64M respectively).
- Also find max_execution_time and set it to 300 if it’s lower.
- Click Apply.
- Go back to WordPress and check Tools → Site Health → Info → Server to confirm the new values are active.

Fix Method 2 — Edit php.ini (Direct File Access)
Direct php.ini editing works across virtually all shared hosting environments and doesn’t depend on your host offering a GUI like cPanel. You’ll need FTP access, SSH, or your host’s built-in File Manager to get started.
- Connect to your server via FTP or open your hosting control panel’s File Manager.
- Navigate to your WordPress root directory (usually
public_htmlorwww). - Look for a file called php.ini. If it doesn’t exist, create one in the root directory.
- If you don’t see it in File Manager, go to Settings → Show Hidden Files and reload.

- Open or create php.ini and add (or modify) these lines:
upload_max_filesize = 64M
post_max_size = 128M
memory_limit = 256M
max_execution_time = 300
max_input_time = 300- Save the file and return to WordPress. Check Tools → Site Health to confirm the new values show up.
If editing the root php.ini doesn’t work on your host, try placing the file inside /wp-admin/ instead — some hosts apply php.ini settings per directory.
Fix Method 3 — Edit wp-config.php or functions.php
This method works from within WordPress itself and doesn’t require direct server access. There are two variations depending on how persistent you need the change to be.
Option A: wp-config.php (recommended for limits)
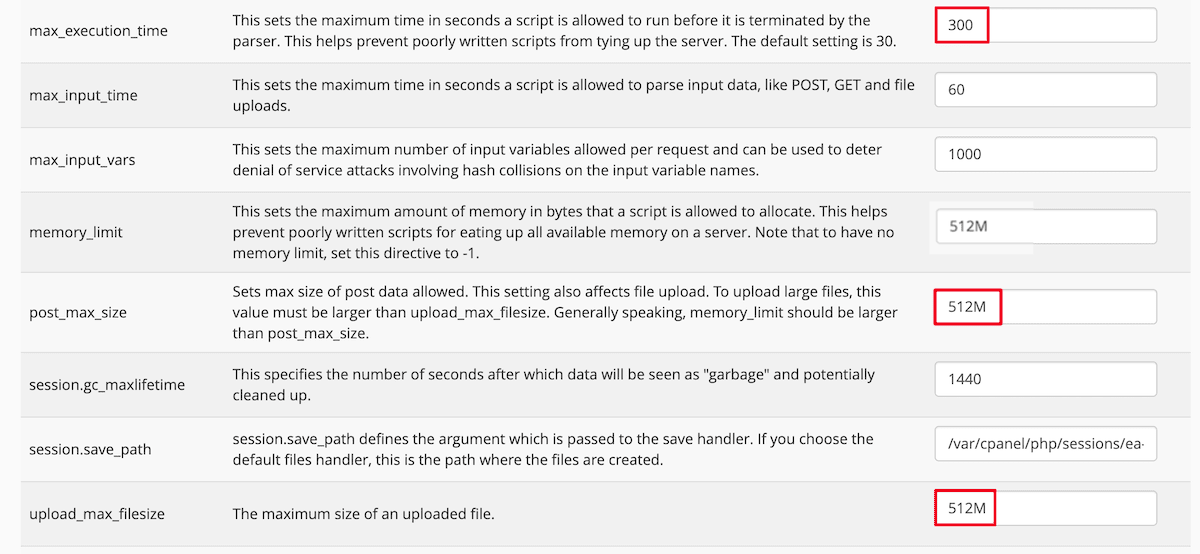
Open your wp-config.php file via File Manager, FTP, or a code editor, and add these lines above the line that says /* That's all, stop editing! Happy blogging. */:
@ini_set('upload_max_filesize', '64M');
@ini_set('post_max_size', '128M');
@ini_set('max_execution_time', '300');
define('WP_MEMORY_LIMIT', '256M');
define('WP_MAX_MEMORY_LIMIT', '512M');
The WP_MEMORY_LIMIT and WP_MAX_MEMORY_LIMIT defines are WordPress-specific constants that set the memory available to WordPress frontend and admin respectively. These work alongside PHP’s memory_limit directive.
Option B: functions.php (using Code Snippets plugin)
Editing your theme’s functions.php directly is risky — those changes get wiped out when you update or switch themes. A safer approach is the Code Snippets plugin (1M+ active installs, 4.7/5 stars on WordPress.org), which stores code snippets independently of your theme.
- Install and activate Code Snippets from Plugins → Add New.
- Go to Snippets → Add New.
- Give it a name (e.g., “Increase Upload Limits”), select Functions (PHP), and add this code:
@ini_set('upload_max_size', '64M');
@ini_set('post_max_size', '128M');
@ini_set('max_execution_time', '300');- Set it to Run snippet everywhere, then click Activate.
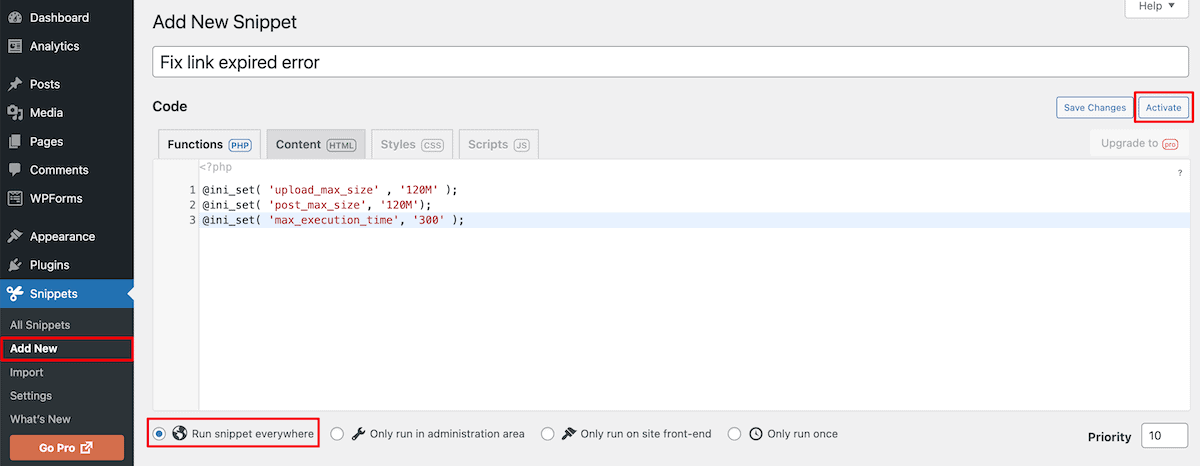
Note: @ini_set() only works if your hosting server allows runtime PHP configuration changes. Some managed hosts disable this function — if the snippet has no effect, use Method 1 or 2 instead. For a broader look at customizing your theme safely, read our guide on editing functions.php safely.
Fix Method 4 — Edit .htaccess (Apache Servers Only)
The .htaccess method works specifically on Apache web servers and LiteSpeed Enterprise. If you’re on OpenLiteSpeed, Nginx, Kinsta, or WP Engine, skip this method entirely — PHP directives in .htaccess are silently ignored on those server types and this fix will appear to do nothing (OpenLiteSpeed KB; Kinsta docs).
To check if you’re on Apache: look for a cPanel login option. If your host gives you cPanel access, you’re almost certainly on Apache or LiteSpeed Enterprise, and this method should work.
- In your hosting File Manager, navigate to your WordPress root directory.
- Enable Show Hidden Files if .htaccess isn’t visible.
- Open .htaccess in a text editor.
- Add these lines before the line that says
# END WordPress:
php_value upload_max_filesize 64M
php_value post_max_size 128M
php_value max_execution_time 300
php_value max_input_time 300- Save the file and test the upload again.
If adding these lines causes a 500 Internal Server Error, remove them immediately — your server may be on an incompatible configuration (SiteGround’s Standard PHP setup, for example, throws a 500 error when you add php_value directives to .htaccess).
Fixing the Error on OpenLiteSpeed and Nginx
Standard fix guides assume Apache. But a growing share of WordPress hosts run OpenLiteSpeed (CyberPanel, many budget VPS setups) or Nginx (Kinsta, WP Engine, Cloudways). On these environments, the .htaccess PHP directives approach simply doesn’t apply — and the php.ini file may need to be placed in a different location. If you’re unsure which server stack your host uses, our WordPress hosting types explained article breaks down the differences.
CyberPanel (OpenLiteSpeed)
Modifying .htaccess won’t work on OpenLiteSpeed. Instead, PHP settings must be configured through the CyberPanel admin interface:
- Log into your CyberPanel admin at
http://[your-server-IP]:8090. - Navigate to Websites → Manage PHP or go directly to
/managephp/editPHPConfigs. - Set the following values:
upload_max_filesize: 64M (or higher)post_max_size: 128Mmemory_limit: 256Mmax_execution_time: 300
- Save and restart your PHP service if prompted.
Cloudways
Cloudways provides a GUI for PHP settings per application:
- Log into your Cloudways dashboard.
- Go to Servers → [your server] → [your application] → Application Management → Application Settings → PHP-FPM Settings.
- Adjust
upload_max_filesize,post_max_size, andmax_execution_time. - Click Apply.
Kinsta and WP Engine
Both platforms run Nginx and do not offer self-service upload limit adjustments. You’ll need to contact support via their respective dashboards. Kinsta supports increases up to 256MB via live chat in MyKinsta; WP Engine also supports increases up to 256MB via a support ticket in the User Portal.
If the Error Isn’t Related to File Uploads
Getting this error on a login page, WooCommerce checkout, settings save, or after a plugin update — without uploading any large file — points to a different cause. Here’s how to work through it.
Clear all caches first
Before anything else, clear your caching plugin’s cache, your browser cache, and your CDN cache if you use one. A cached admin page can hold an expired nonce and produce this error on every visit until the cache is refreshed.
Check for plugin conflicts
Deactivate all plugins except the one you suspect might be causing the issue. Test whether the error disappears. If it does, reactivate plugins one at a time until the error comes back — that’s your culprit.
If you can’t access the admin at all, connect via FTP or File Manager and temporarily rename your /wp-content/plugins/ folder to something like plugins_disabled. WordPress will deactivate all plugins. Rename it back once you’ve identified the problem plugin. For a full walkthrough of the conflict testing process, see our article on how to diagnose WordPress plugin conflicts.
Update plugins, themes, and PHP version
An outdated plugin or theme that hasn’t been tested against your current WordPress or PHP version can trigger unexpected errors. Update everything, then test again. For PHP version, aim for PHP 8.1 or 8.2 — any version below 7.4 is no longer supported and can cause compatibility issues.
Host-Specific Quick Reference
Not sure where to find PHP settings on your specific hosting provider? This table maps the eight most common WordPress hosts to their control panel and the exact path to PHP configuration.
| Hosting Provider | Control Panel | How to Change PHP Settings | Self-Service? | Default Upload Limit |
|---|---|---|---|---|
| SiteGround | Site Tools | Devs → PHP Manager | Yes | 256 MB (fixed on shared) |
| Bluehost | cPanel | Software → MultiPHP INI Editor | Yes | 50 MB |
| GoDaddy | cPanel | Software → MultiPHP INI Editor | Yes | Varies by plan |
| Hostinger | hPanel | Advanced → PHP Configuration | Yes | Varies |
| Kinsta | MyKinsta | Contact support via live chat | No | 128 MB (max 256 MB) |
| WP Engine | User Portal | Contact WP Engine Support | No | 50 MB (max 256 MB) |
| Cloudways | Platform dashboard | Servers → App → Application Management → PHP-FPM Settings | Yes | 100 MB |
| DreamHost | Panel | Domains → Manage Domains → PHP Config | Yes | 64 MB |
For Kinsta and WP Engine, note that files larger than 256 MB cannot be uploaded through the WordPress admin regardless of limit settings. Those files need to go through SFTP or SSH instead. Kinsta’s default limit and support process is documented in their max upload size docs; WP Engine’s process is covered in their upload size resource.
Frequently Asked Questions
What causes “the link you followed has expired” in WordPress?
There are two primary causes. The most common is that the file you’re trying to upload exceeds your server’s PHP file size limits (upload_max_filesize or post_max_size). The second cause is a WordPress nonce expiry — a security token attached to the admin page expired before you submitted the action, usually because the tab was left idle too long or a caching plugin served a stale page.
Does this error only happen when uploading files?
No. The nonce-related version of this error can appear on login pages, WooCommerce checkout, plugin settings pages, and after plugin updates — any situation where a WordPress security token times out before the request completes. If you’re seeing this error without any file upload, nonce expiry or plugin conflict is the more likely cause.
What’s the difference between upload_max_filesize and post_max_size?
upload_max_filesize controls the maximum size of a single file in an upload. post_max_size controls the maximum total size of all data in a POST request — which includes the file plus any accompanying form data. Because post_max_size wraps the entire request, it must always be set higher than upload_max_filesize. Setting both to the same value usually causes issues.
My .htaccess fix isn’t working — why?
The .htaccess method for PHP settings only works on Apache and LiteSpeed Enterprise servers. If your site runs on OpenLiteSpeed, Nginx, Kinsta, WP Engine, or any Nginx-based managed host, PHP directives in .htaccess are silently ignored. Try editing php.ini or wp-config.php instead, or use your host’s control panel.
How do I know what upload limit to set?
For most business WordPress sites and WooCommerce stores, 64M for upload_max_filesize and 128M for post_max_size covers the vast majority of premium themes and plugins. If you regularly upload video files or large course content, 256M is reasonable. Avoid setting values like 2048M unless you genuinely have a need — there’s no benefit to allocating resources your site won’t use.
Can a plugin cause this error without any file upload?
Yes. Some plugins interfere with WordPress’s nonce verification or session handling in a way that triggers this error as a fallback message. If clearing caches doesn’t fix it, deactivating plugins one at a time is the most reliable diagnostic. Start with any plugin you installed or updated around the time the error first appeared.
How do I fix this on GoDaddy?
Log into your GoDaddy hosting account and open cPanel. Search for MultiPHP INI Editor, select your domain, and adjust upload_max_filesize, post_max_size, and max_execution_time to your desired values. Click Apply. If you’re on GoDaddy’s Managed WordPress product (not cPanel-based), contact GoDaddy support to request the limit increase.
Will increasing PHP limits hurt my site’s performance?
Not directly. These settings define maximum allowed values, not constantly allocated resources. Raising upload_max_filesize to 64M doesn’t mean your server allocates 64M for every request — it just means PHP won’t reject files up to that size. The practical performance impact of increasing these limits is negligible for normal site operation.
Wrapping Up
The “link you followed has expired” message is frustrating precisely because it gives you nothing to work with. But once you know the two causes — PHP upload limits and WordPress nonce expiry — the path forward is clear.
For upload-related cases: check your limits in Site Health, identify your hosting environment, and use the method that matches your access level. Most users on shared cPanel hosting can resolve this in under five minutes using the MultiPHP INI Editor. Those on OpenLiteSpeed or Nginx-based managed hosts need to either use the host’s specific admin panel or contact support directly.
For non-upload cases: start with a full cache clear, then move to plugin conflict testing. Updating plugins, themes, and PHP to current versions resolves the majority of session and nonce-related instances.
After applying any fix, always verify the change took effect by checking Tools → Site Health → Info → Server — the new values should appear there immediately if the configuration was applied correctly.